This article will detail features of Hybrid Reporting and how to install and configure the Hybrid Agent (desktop application).
Live Reporting for on-premise ERP systems
Solver Cloud offers customers with on-premise ERPs the ability to report live off these systems using the Solver Cloud Agent. Hybrid reporting requires a quick installation and configuration process, a customer will be able to connect any of the below-mentioned ERPs, that they host on their systems, to Solver Cloud.
Hybrid support for on-premise ERPs for both Reporting and Planning
- Dynamics GP2016+
- Dynamics SL2016+
- Dynamics NAV (Business Central On-Premise)
- SAP B1 v9.0+
Hybrid support for on-premise ERPs for Reporting ONLY
- Acumatica 2016+
- Dynamics AX2009
- Sage 100/300/500 2016+
Because Solver is a cloud service, and many of our users have on-premise ERP systems, we introduce Solver Cloud Agent. The Cloud Agent is a gateway agent that acts as a bridge providing fast and secure data transfer between the on-premise ERP data and the Solver portal.
Solver Reporting Cloud Agent
This installation guide applies to users of on-premise ERP systems, such as Microsoft Dynamics GP, SL, and Nav, as well as many other ERPs.
To set up such an environment, users are required to install a Cloud Agent on their server(s) to create a gateway. The Cloud Agent allows Solver to access data from your on-premise ERP databases. This machine must allow for outbound communication with *.solverglobal.com URLs.
Installing and configuring the Cloud Agent is usually done by an administrator. It may require special knowledge of your on-premises servers, as well as your ERP system.
How to install Solver Cloud Agent?
Technical Requirements
Minimum requirements:
- 64-bit version of Windows Server 2016 R2 (or later)
- 4gb ram
Recommended:
- 4 core CPU
- 8 GB memory
- SSD storage
- 64-bit version of Windows Server 2016 R2 (or later)
Pre-Requirements
Usually, an administrator installs and configures the Hybrid Agent, as it may require special knowledge of your on-premises servers, as well as your ERP system. Here are a few things to consider before installing the agent:
- If you are installing it on a laptop, and your laptop is turned off, not connected to the internet, or asleep, the Cloud Agent won’t work and Solver Reporting will not be able to retrieve data.
- If your machine is connected to a wireless network, the gateway may perform more slowly.
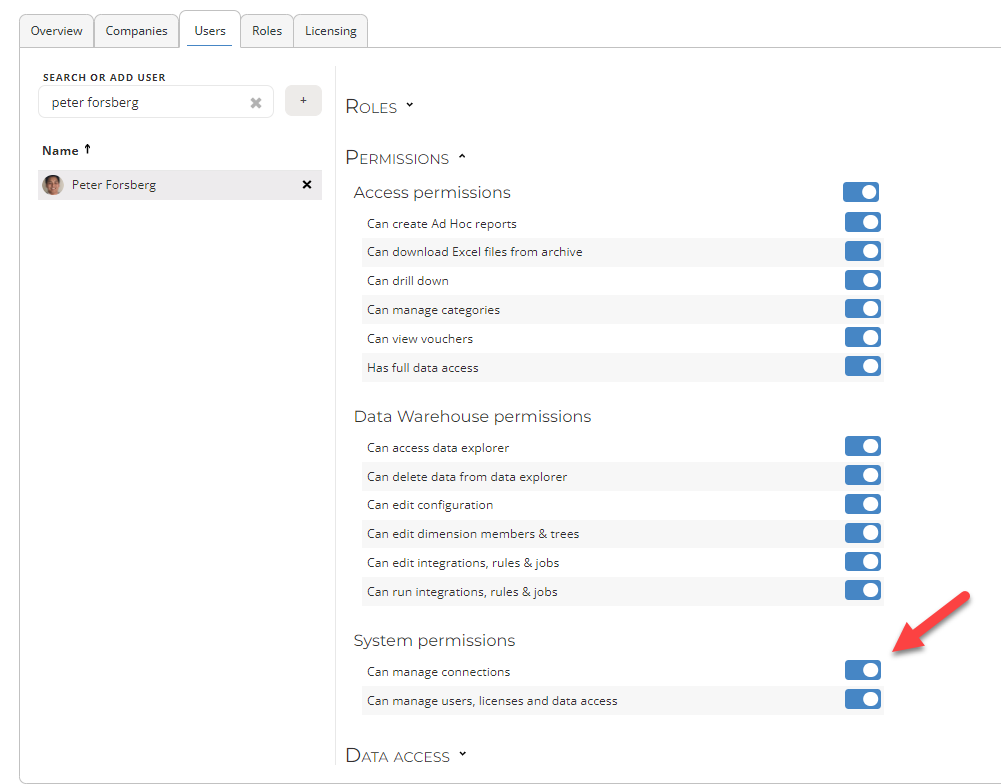
The following steps requires the Solver user to have can manage connections permissions within their tenant.
Installing the Integration Package
Downloading the Installer
The Hybrid Agent installer is downloaded from within Solver.
- Log into Solver.
- Click Settings > Data Connections. A listing of all configured, non-Data Warehouse connections will appear
- Click New
- Select your integration package related to the ERP you are wanting to connect to Solver
- Click Next
- Select Download and Install the Cloud Agent.
Keep this screen open, we will be coming back to it later.
Installing the Hybrid Agent
Once the download is complete, navigate to the folder location you saved the executable. The instalation creates a small web page on port 5002.
- As an administrator, run the executable. First screen is the Welcome screen and begins the installation process. Click Next
- The installation will begin and should complete in seconds.
Once completed, a desktop shortcut (Solver Cloud Agent) is created that will navigate you to localhost:5002 on your default web browser. Once this page loads, the installation is complete and it is time to create your connection between your ERP database and Solver.
Should you need to do any maintenance or change the configuration of your connection between Solver and the ERP, you will come to this web page on the Hybrid Agent server to make any edits. Please save this server information as the server where Hybrid Agent was installed.
Add a Data Source
- From within the Hybrid Agent web page (localhost:5002), click Add data source.
NOTE: If you are using a proxy server, click the Settings button to access the proxy server settings.
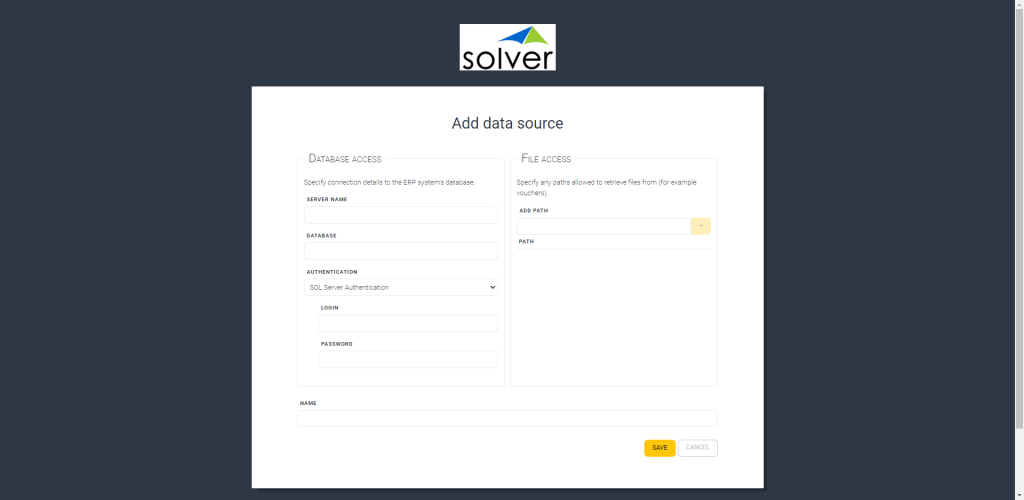
- In the Server name field, enter the name of your SQL server. IP address is okay as well.
- In the Database field, enter the database name of your ERP master database.
- Under Authentication, select SQL Server Authentication or Windows Authentication*. If you select SQL Server Authentication, you must fill in your Login name and Password.
- File Access is used for certain ERPs such as Visma and can be left black if you are using a Dynamics, SAP or Acumatica product.
- In the Name field, enter a name for this data source such as “GP Prod”
- Click Save.
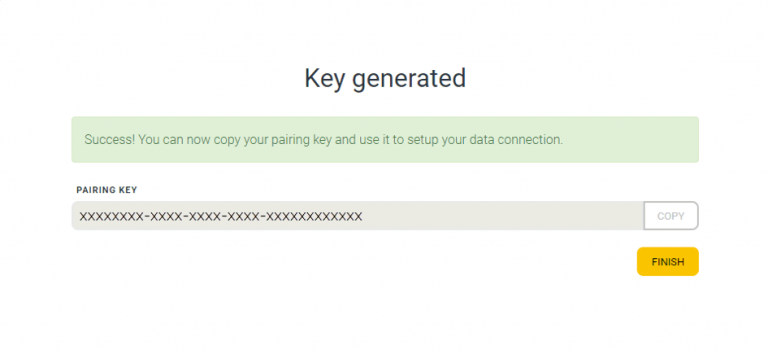
- Upon clicking save you will be shown a pair key. Copy the pairing key and paste it into the Pairing Key text box found within the screen where you downloaded the Hybrid Agent Installer.
Create the Connection To Solver
Next, you must set up a connection to your data from Solver.
To setup a connection between Solver and your ERP database:
- Be sure that you still have the pairing key that was generated earlier in the installation.
- If you are not already on the Data Connections menu, click Settings > Data Connections and click New in the upper left-hand corner.
- If you do not see this menu option, you need to be granted “Can manage connections” permissions by an administrator.
- If you do not see this menu option, you need to be granted “Can manage connections” permissions by an administrator.
- If no connections have been made, in the popup that appears choose the integration for your ERP system.
 Click Next
 - You will be prompted for your Pairing key, paste it in.
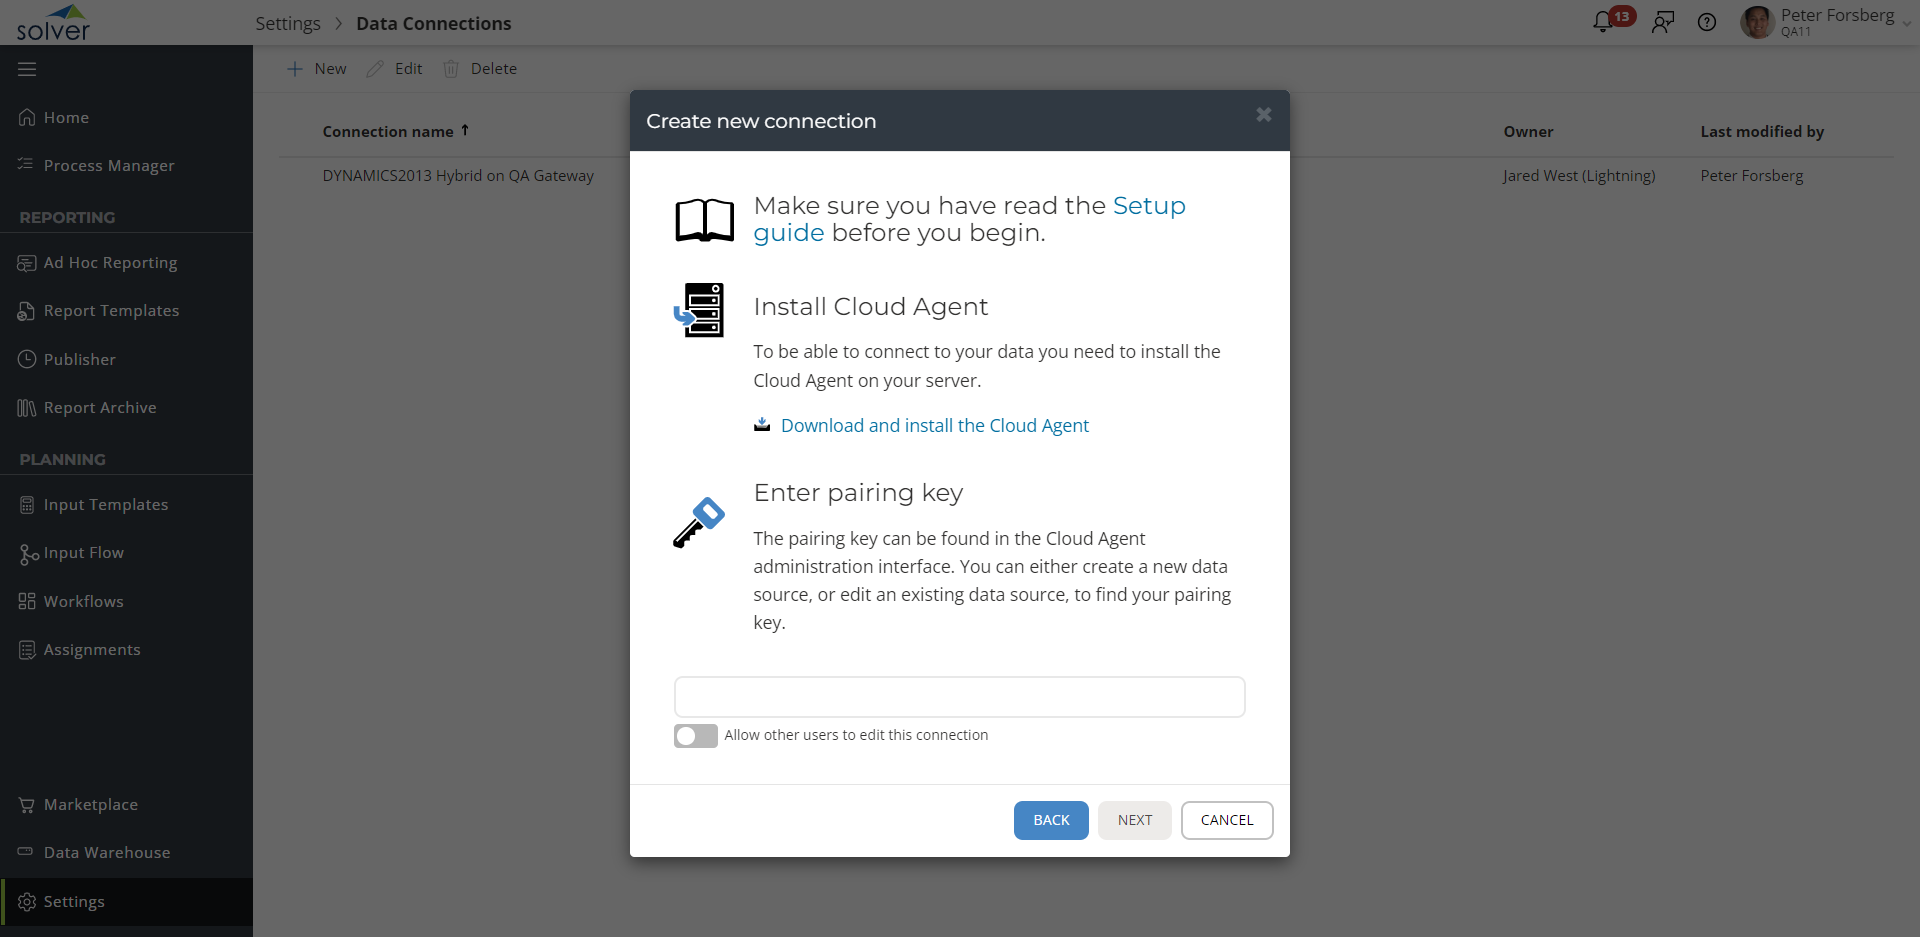
- There is the option to allow others to edit/modify this connection. Enable this option only if others with “can manage connections” permissions should modify this.
- You will then be prompted to select the companies that should be made available in Solver.
- The number of companies available is based on the number of companies purchased.
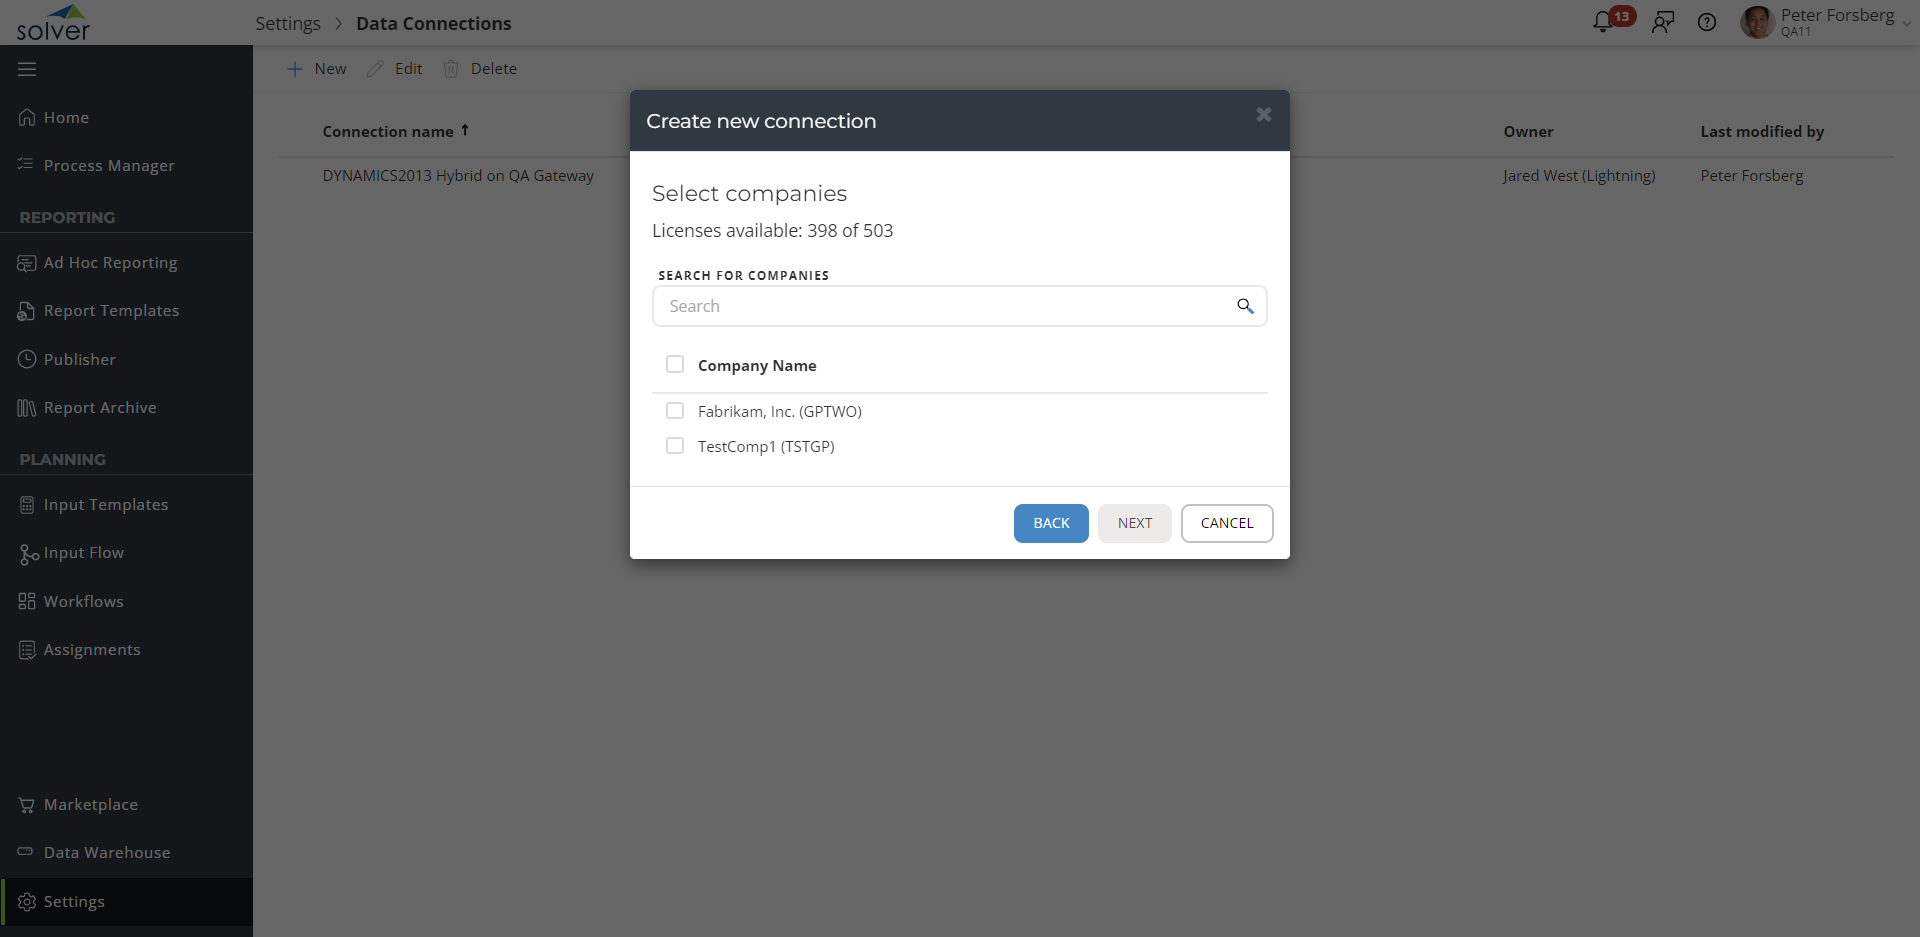
- Create a name for the Connection. It is recommended to do a descriptive name identifying where the Hybrid Agent has been installed for troubleshooting purposes.

Click Finish. The connection has now been established and you can begin to create your first report.
As a reminder, for non-administrator users, you will need to setup company and data access permissions for each end user or role that should have access to this data. By default, all non-administrators have no permissions to the data. This can be configured in Settings > Administration > User and Roles tabs.
Technical Notes
Change Solver Cloud Agent service account
You can change the Solver Cloud Agent service account. By default, this is set up to be local.
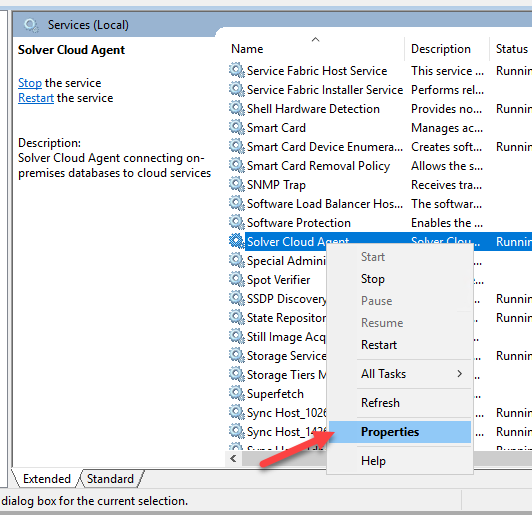
- Open Control Panel > Administration tools > Services.
- Find the service Solver Cloud Agent.
- Right-click the service and select Properties.
- On the Log On tab, select This account.
- Enter the account name and password.
- Click OK.
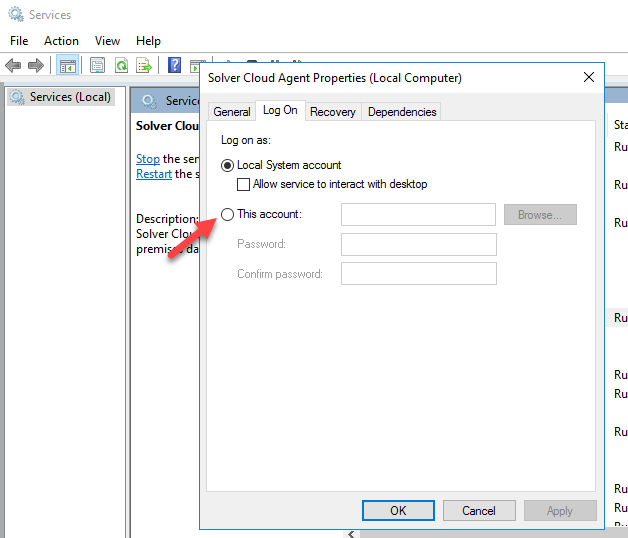
NOTE: The account you set up here is also the account that needs permission to access the path(s) where the vouchers are stored.
Uninstalling the Hybrid Agent
To uninstall the Hybrid Agent
- Log into the computer where the Hybrid Agent was installed
- Navigate to Control Panel > Programs and Features
- Search the list for “Solver Cloud Agent”
- Choose Uninstall
Upon completing the uninstall process, the Solver Hybrid Agent is removed from the computer and no longer connected to Solver. Any reports, input template or Ad Hoc report connected to a connection created via the hybrid agent will no longer work