Solver includes a robust integration to NetSuite. Solver connects to NetSuite via NetSuite’s Saved Search service, allowing Solver users to connect to almost any data set in their NetSuite implementation, with some knowledge of Netsuite’s Saved Search functionality.
Solver uses the following technologies provided by NetSuite
- RESTlets
- SuiteScripts
Provided Assets and Suite Bundle
Solver provides Saved Search templates for standard datasets, including the General Ledger. Please reach out to Solver Support (support@solverglobal.com) to request access to these Saved Searches.
- You must provide your NetSuite Account ID in order to get access to Solver’s Saved Search templates.
Solver’s Saved Search template includes saved searches to
- GL Detail
- OBA
- Accounts Payable
- Accounts Receivable
- Inventory
These Saved Searches act as a starting point for you to get data into Solver. However, each NetSuite implementation is unique, with its own unique set of data, and these Saved Searches may require modification. While Solver Support may be able to provide some basic support and/or direction to expand these Saved Searches to include your additional data, you may have to reach out to your NetSuite consultant or internal resource trained on Saved Searches.
This article will detail the steps required on the NetSuite side to connect Solver to your installation. Please review these steps in full with your NetSuite consultant before beginning. The following tasks include:
- An account with access to the relevant data is required. Solver supports two authentication types: Login and Token-based.
- Token-based authentication is recommended for all new and existing NetSuite integrations.
- NetSuite has deprecated the login (Username and password) for all new connections to Saved Searches as of April 2021. All new integrations must use token-based authentication.
- Existing NetSuite integrations created in Solver using login-based authentication will continue to work, but it’s strongly recommended that you switch to token-based authentication.
- Configure Role Settings
- Create a RESTlet script
- Create Saved Search Settings
Configuring Access to NetSuite
This next section will detail steps in NetSuite that are required in order for Solver to successfully connect. These steps include how to get your
- NetSuite AccountId
- Case Sensitive for authentication purposes
- NetSuite token(s), including Token ID, Access Token, Consumer Key and Consumer Secret.
- Case Sensitive for authentication purposes
- Suite Bundle
- Saved Searches
- Case Sensitive for authentication purposes
- RESTLet
- Saved Searches
- Deployment URL
The below steps assume that the user logged in is a NetSuite Administrator
Netsuite Account ID
To find your NetSuite Account ID
- Setup > Company Info
On the top of the page, in the right column will be your Account ID.
Enable SuiteScripts and Token Based Authentication in your NetSuite Implementation
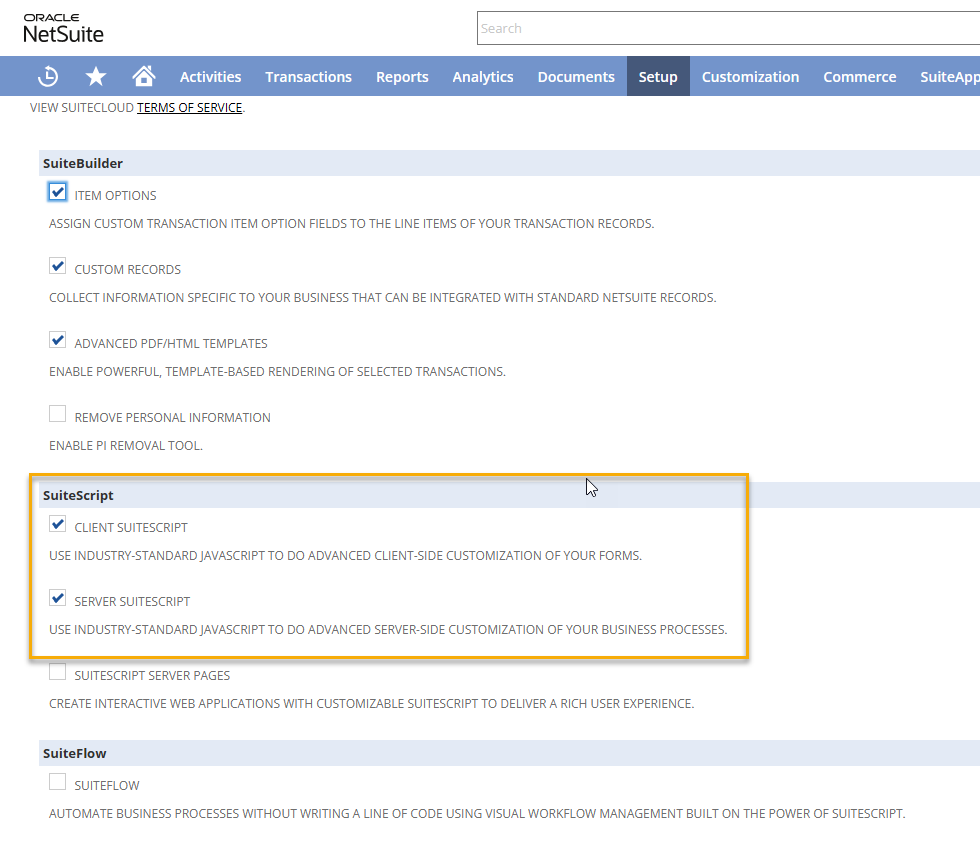
Solver’s NetSuite connector requires the following SuiteScript features to be enabled.
- Setup > Company > Enable Features > SuiteCloud
- Scroll down the list to SuiteScript and enable:
- Client SuiteScript
- Server SuiteScipt
- Scroll further down the page and enable “Token Based Authentication”.
- Scroll to the bottom of the page and click Save.
Create a NetSuite Consumer Key and Secret
As mentioned above, token-based authentication is required in Solver for all new NetSuite integrations. Please reference this NetSuite article (https://docs.oracle.com/en/cloud/saas/netsuite/ns-online-help/section_4247337262.html) for how to create and view your access tokens.
- Solver Support does not support configuring these tokens.
- Tokens should be kept secure, share this information with caution.
Create a NetSuite Access Token and Token Secret
Once the Integration Record is created, you can create the token and token secret. Follow these instructions for how to create a token (https://docs.oracle.com/en/cloud/saas/netsuite/ns-online-help/bridgehead_4254081947.html).
Create an Integration Record
The next steps will help get a Consumer Key and Secret, necessary for login from Solver into your NetSuite implementation. This step is documented here (https://docs.oracle.com/en/cloud/saas/netsuite/ns-online-help/bridgehead_4249032125.html#procedure_4253065190). In addition:
- For the page that loads
- Name can be a user friendly name such as “Solver Cloud to NetSuite”
- Description: provide any additional information you want to record about this integration,
- State: set this to enabled.
- Concurrency Limit: 2
- Leave all properties of OAuth2.0 unchecked/empty
- Leave User Credentials unchecked.
- Click Save
This will create the Client Credentials that are need for Solver. Record the
- Consumer Key
- Consumer Secret
found at the bottom of the page. This information is shown this one time and is not accessible after leaving the page. Share this information with those responsible for assisting in the implementation of Solver upon request.
Create a Role
Create a NetSuite role to be used for accessing data.
- Navigate to Setup > Users/Roles > Manage Roles
- Creating role with the necessary permissions. An existing role can be used as well, if preferred.
- Depending on the data that needs to be brought into Solver. The following permissions are needed on that role
- Permissions > Transactions
- View permissions for “Find Transaction”
- View permissions for the relevant data that should be brought into Solver. For example, if you want to see Journal Entries, you will want to give View Permissions for “Make Journal Entry”
- This part takes a bit of knowledge of your NetSuite Implementation. You can see what data the Saved Search is returning by going to Reports > Saved Searches
- Find the relevant saved search and click Edit.
- Under Criteria > Standard you can see the types of transactions that are being allowed/omitted. Modify this filter, and any of the other filters, to get the data needed to be brought into Solver. The status you allow/omit should then be applied to the Permissions > Transactions
- Permissions >Lists
- View permissions to any dimensional data. Examples of dimensional data could be Accounts, Vendors, Customers, Departments as configured in NetSuite.
- Permissions > Setup
- Full access to “Log in using Access Tokens”
- View access to “Manage Accounting Periods”
- Permissions > Transactions
This completes the configuration of the role. Next, go to your Users list and add the logins that should have access to this role.
- Setup > Users/Roles > Manage Users.
- Find the username and click Edit.
- Scroll down the page to Roles and add the user to the desired role.
- Scroll to the bottom and click Save.
Change to permissions and the roles that an account is assigned to typically take immediate effect. However, there may be delays up to 10 minutes for a change to take effect.
Suite Bundle
At the very beginning of this article, instructions where given on how to request the Solver NetSuite assets including Saved Searches and a RESTLet, which is packaged in a Suite Bundle. After Solver Support confirms access to the Suite Bundle,
- Navigate to Customization > Suite Bundle > Search and Install Bundles
- IN the Keywords, type in Solver and hit Search
- The “Solver Saved Search & RESTLet Script” should appear as a result.
- Click on this name and click Install.
This will install the Saved Searches and the RESTLet
Saved Searches and Saved Search ID
To view the installed Saved Searches
- Navigate to Reports > Saved Searches > All Saved Searches
- In the list that appears, searching for the title that starts with “Solver -” will indicate the Saved Searches that have just been installed.
- Your organization may create their own Saved Searches or use these
For integrating with Solver, you will need the string that is found in the ID column, which should start with “customsearchsolver_” for the Solver provided Saved Searchers.
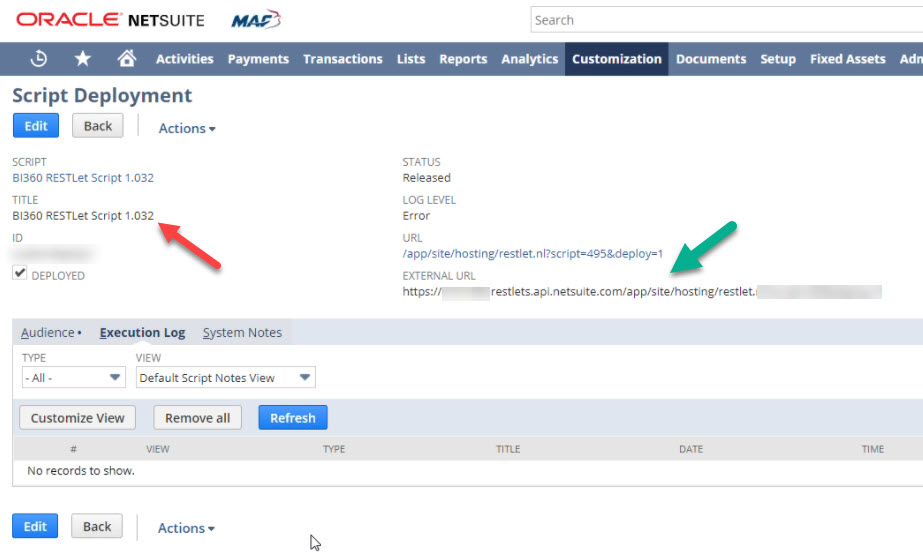
Deployment Script URL
The Deployment Script URL can be found by:
- Log on to NetSuite > Customization > Scripting > Scripts
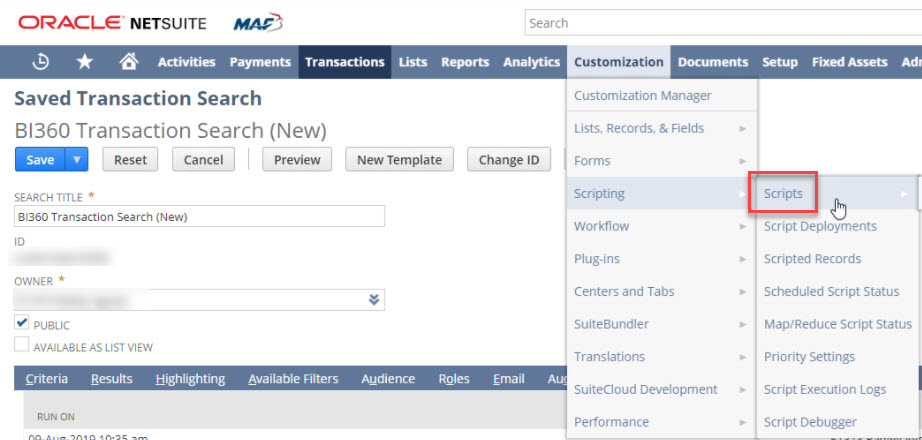
- You should see a list of scripts, look for Solver RESTLet Script 1.0xx, and select it.
- Navigate to Deployments, then click on the script in the red box below.
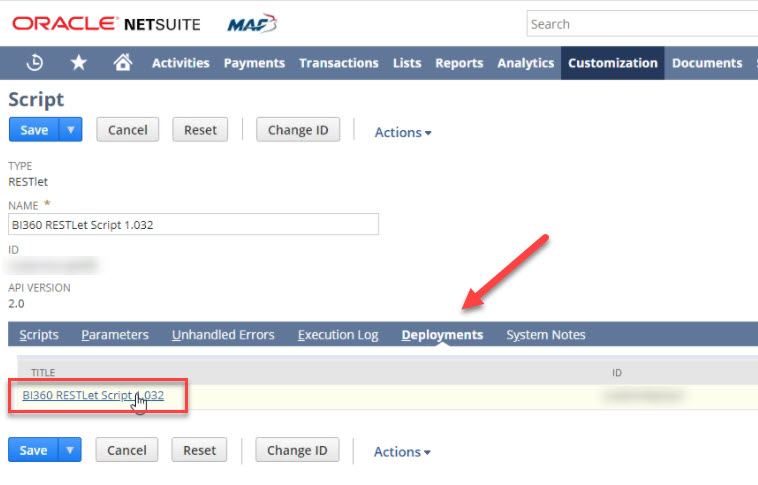
- In the below screenshot, red arrow points to the version number, you can also check the external URL (green arrow) to verify you are connecting to the right script in Solver.
This completes the NetSuite setup, enabling users to connect Solver to your NetSuite implementation.
Authentication Requirements in Solver
With the above information complete, users can now create an integration from NetSuite to Solver using Solver’s NetSuite connector.
The following steps assume the user has permissions to the Data Warehouse with “Can edit integrations” permissions.
- Log into Solver > Data Warehouse > Data > Integrations > Add New (upper right hand corner)
- Select the NetSuite Connector.
- The NetSuite connector will load. Users will be prompted to choose between Login-based and Token-based authentication.
All fields are case sensitive.
- For Token-based authentication, the following needs to be provided.
- Customer Key
- Customer Secret
- Token Id
- Token Secret
- AccountId
- Transaction Saved Search ID
- Deployment Script URL
- Netsuite Server
- For Login-Based Authentication, the following needs to be provided.
- Username
- Password
- RoleId
- AccountId
- Transaction Saved Search ID
- Deployment Script URL
- NetSuite Server
- For Token-based authentication, the following needs to be provided.
- Click Log In. Assuming that the correct credentials have been provided, you will successfully proceed to creating an integration.
Limitations
- Solver’s NetSuite connector does not support parent attributes.
- Your NetSuite purchase includes dedicated “lanes” for SuiteCloud requests that can prevent Solver Cloud from accessing your NetSuite data. If you already have many integrations configured from NetSuite to other tools, please verify that you have enough “lanes” to allow the Solver NetSuite connector to communicate with your NetSuite environment. Talk to your NetSuite Account Manager for more details.
- NetSuite does throttle API requests. In addition to additional “lanes” that can be purchased, NetSuite offers increased API bandwidth options for faster data loads into Solver Cloud. Talk to your NetSuite Account Manager for more details.
- Searches that fail to return data within 10 minutes will need to be reconfigured and rerun.
Saved Search Requirements
- In a saved search, fields that are Formula (numeric) will require that the summary label is provided.
- When working with data that can have the same dimensional values, sorting (Saved Search> Results > Sort By) by Line Unique Key is required.
Legacy Authentication Methods
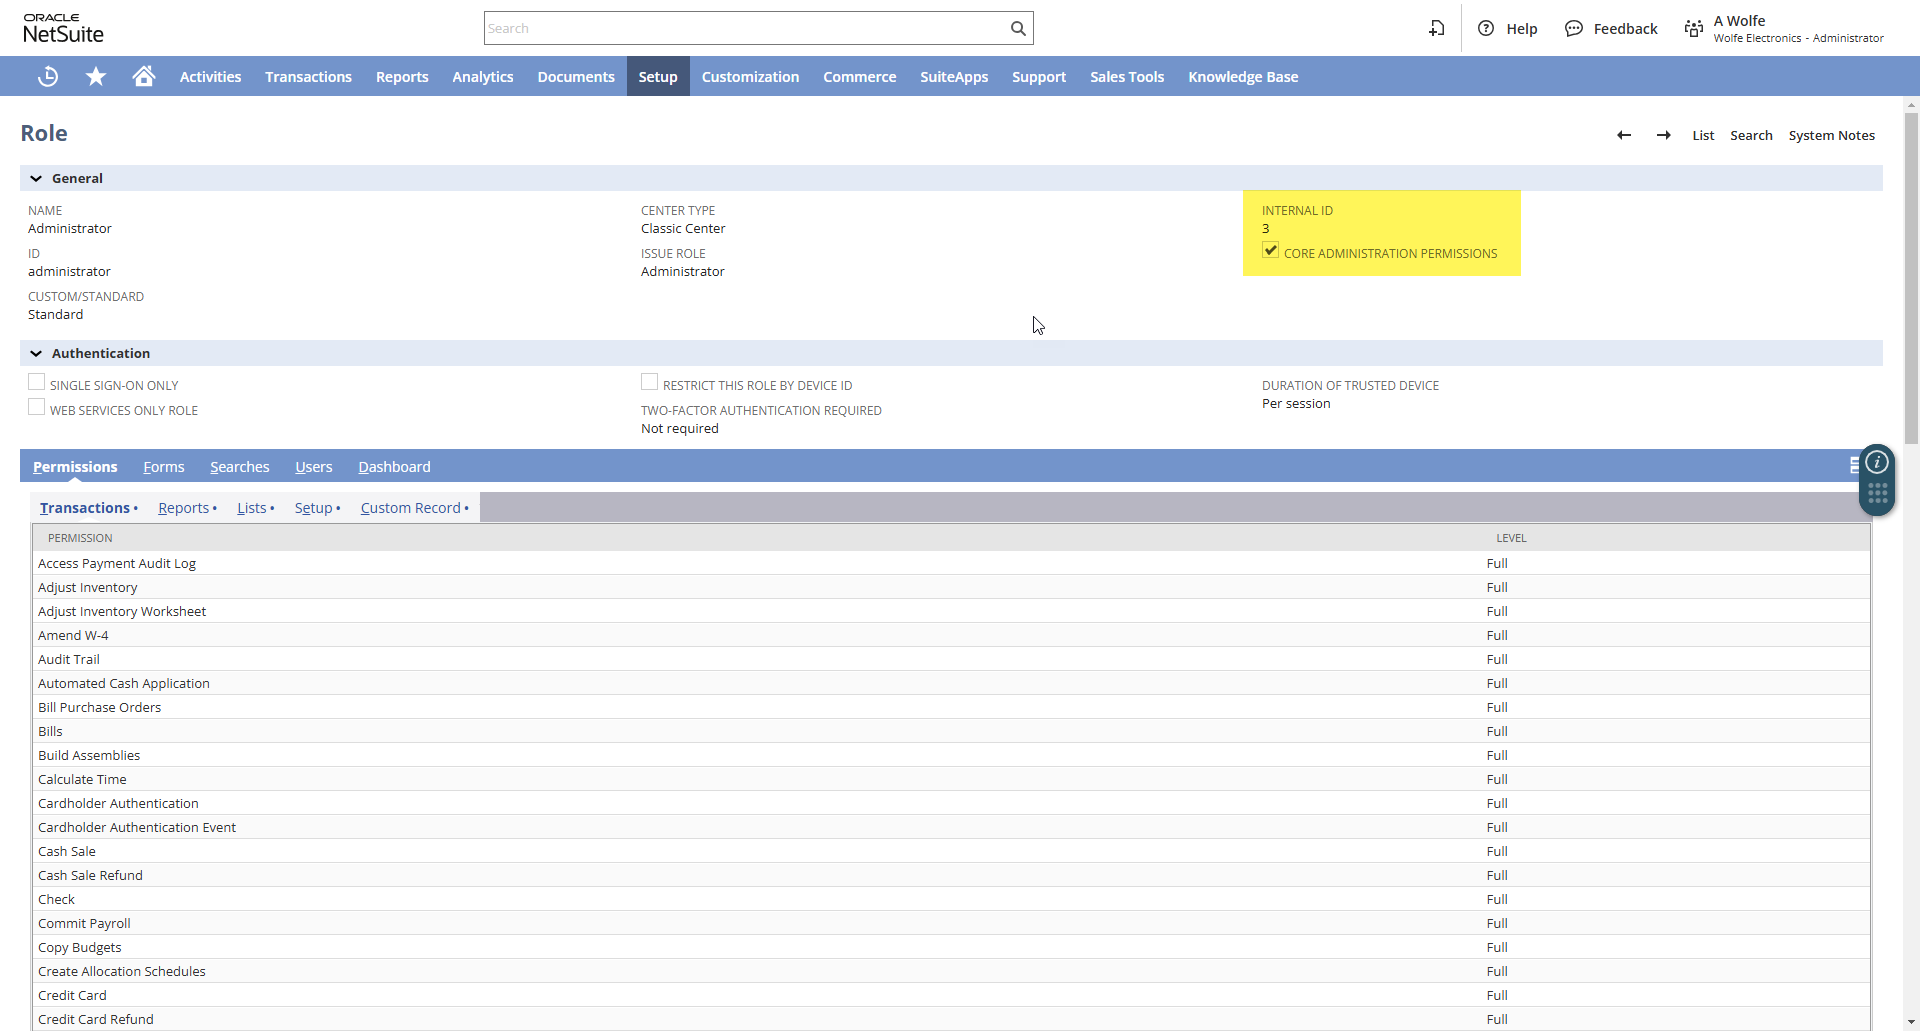
Finding a User’s RoleID For User Based Authentication
- For the above account, keep a record of this account’s RoleID. To find a user’s RoleID, navigate to Setup > Users/Roles > Manage Users > Select the User > Scroll down the page to Roles to view the role(s) the Click on the Role they are associated with
The page will update to details of the role, which will include that role’s roleID.