This article will detail how to create an input template for use in Solver. Input templates allow you to write back to the Solver or to supported, ERP systems. In addition, input templates can be
- Assigned to other users for their inputs
- Added to Assignments for completion
- Add to Workflows for budget submission and approval
- Add to Input Flows for driver based budgeting processes.
An input template is a report with budgeting settings added to it. These budgeting settings map the data that defines the transaction(s) being stored back to Solver. The design and the budget settings must be setup correctly in order to ensure successful storage for all types of data entry, whether creating, update or deleting data via an input template.
This article will assume that you are familiar with creating reports.
There are two ways to create an input template.
Option 1: Utilize an Existing Report
Input templates can be created from an existing report. To do so, as a user with Can create input templates permissions.
- From the Report Templates menu, select the report that will be the format of your input template and click Download
- Navigate to Input Templates
- Click New > Upload Template and select the previously selected file from your File Browser.
Option 2: Create an Input template from scratch
Input templates can be created from scratch. To do so, as a user with Can create Input template permissions.
- Navigate to Input Templates
- Click New > Create New Template
- In the popup that appears, provide a new for this input template and click Save
- The report will be created and an option will appear to open the report in Report Design to begin the Input Template creation process.
Configure Input Template Budgeting Mappings
This section assumes that an Input template has been created and is running as expected. Budget mappings require you to define all the dimensions and attributes that make up a transaction. Understanding your data and mapping all dimensions is critical for data integrity and for a consistent, successful storage experience.
Terminology
Before we proceed, below is some key terminology:
- Mandatory Fields: these represent the dimensions that make up a transaction. All dimensions that define a transaction, whether they could be blank, “Null”, or have a value should be considered “mandatory”. Solver will pre-populate some dimensions based off the groupings of the row, column and selected cells, but typically more dimensions will need to be added to this mandatory section.
- Option Fields: optional fields are the attributes of the transaction. If a single budget line has multiple storage fields, these additional attributes should be mapped to the optional section.
- Uniqueness: Solver enforces data uniqueness to ensure that duplicate data is not accidentally added. Uniqueness is based off the combination of dimensions that make up a transaction. Each transaction, think of this as the intersection of the row and column, should have a unique set of data.
Mapping Your Budgeting Settings
- In Design mode within Report Designer, Select a cell in your input template where a user will be typing in values.
- In the Layout Editor popup, click the Budgeting tab at the bottom.
- If your field in the cell is a field from the navigation pane, it will auto populate in the Store To section. If the field is cell is based off a formula, you will need to choose the module and the attribute that this cell is storing back to.
- Based off the above selection, some dimensions of the field will appear in the Mandatory section. These are indicated with a lock icon.
- There is a dropdown that is available with some options and may pre-populate with some values. The dropdown will be blank and will require user selection/input unless it prepopulates for one of the following reasons:
- The dimension is a parameter. this will be indicated by the @ symbol prefixed to the dimension name.
- The dimension is a grouping on the row or column of the cell. This is indicated by { } around the dimension name.
- For each field, define where the dimension code can be found. This can be
- A cell reference
- A hardcoded string wrapping the string within single quotes.
- *<Cell reference>
- Repeat these steps for each dimension.
- If your value has additional attributes that should be stored, drag these attributes into the option fields.
- If you cannot drag attributes into the Optional fields section, it may be collapsed. Hit the + icon next to Optional fields to expand the section so that attributes can be dragged into this section
- Repeat the above steps, mapping the location of each optional field.
This completes the Budgeting mapping section.
Test Your Template
After completing the budgeting setup, its recommended to test your template. As a best practice, the following should be considered when testing your template.
- Store data back to a test scenario. While testing a template, its good to use non-production budget scenarios. You can create additional scenarios via the Data Warehouse.
- Test all types of data entry. This can include
- adding new budget data of all lengths and precisions based on your needs. While Solver does test all type data entry, its good to test your specific use cases.
- updating existing budget data
- deleting budget data
- Creating some budget data, updating existing and deleting budget data in one save attempt.
- successful storage of all attribute data.
If the above budgeting settings are correct, the above test scenarios should all work as expected.
Settings
Settings provides some additional options for how Solver will store data. These options include.
- Store unchanged cells: This option will force data from this cell to always be stored. The application will not do a check whether the input cell has changed its value or not.
- Ignore rows dropdown: also referred to as “ignore syntax”, use this feature to identify rows to ignore based off if logic. When enabled, Solver will look at Row 1 and/or Column A for a character, typically a “i”. during the storage routine and ignore any row/column if a character exists, based off the ignore setting selected.
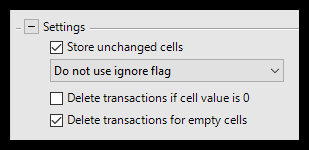
By default this feature is off but users can choose between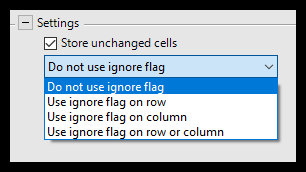
- Use ignore flag on row: If the first cell in a row contains a value, the entry is ignored; hence not stored. False, 0, or empty string count as no value.
- Use ignore flag on column: If the first cell in a column contains a value, the entry is ignored; hence not stored. False, 0, or empty string count as no value.
- Use ignore flag on row or column: If the first cell in either the row or column contains a value, the entry is ignored; hence not stored. False, 0, or empty string count as no value.
- Delete transactions if cell value is 0: Means that cells including 0, NULL, or empty are not stored. This is useful when you have larger budgets to avoid creating unnecessary records.
- Delete transactions for empty cells: Normally, values in a cell are deleted after pressing BACKSPACE or DEL or blanking out the value. If this option is selected, the value is used to update existing/insert a record in the storage dimension. This will also apply to transactions where there has been a value that has now been set to 0.
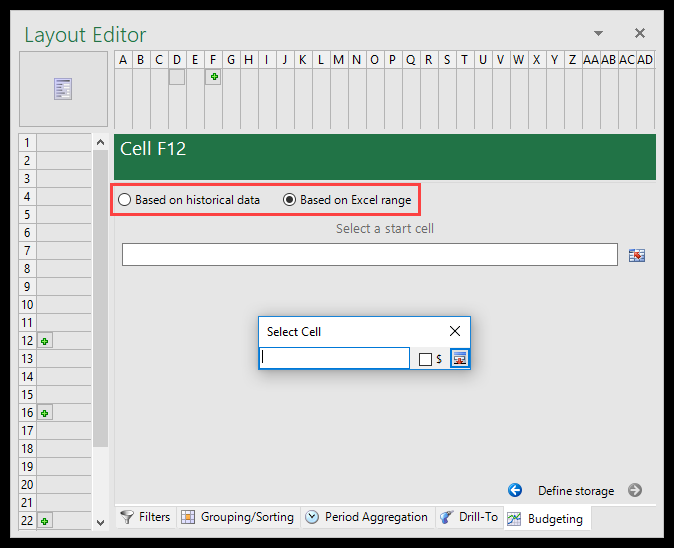
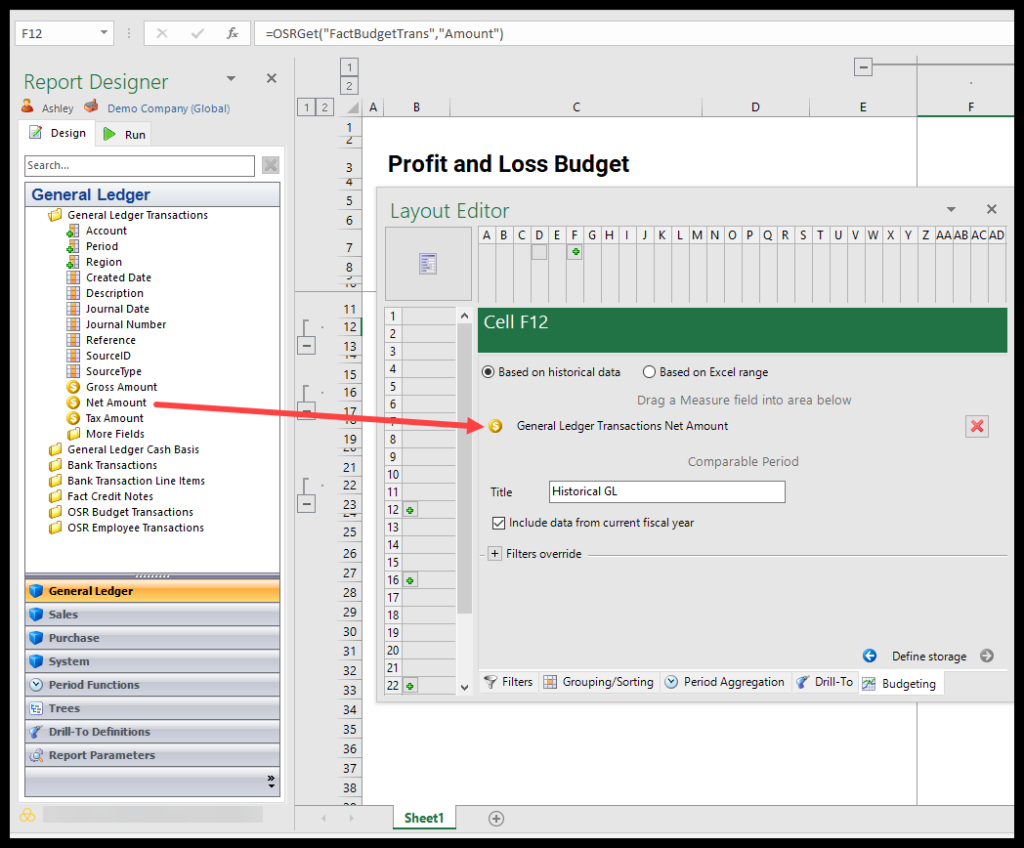
Define Comparable Data
The Comparable data functionality allows the budget template creator to set up comparison data for the users performing the budgeting in the portal when using the Spreading and Line Item Detail tool.
There are two main options for defining the comparable data;
- Based on historical data: If you use this option, you will get data from your accounting system.
- Based on Excel range: If you use this option, you must define the area in the Excel sheet you want to show when using comparable data in the Spreading and Line Item Detail tool.
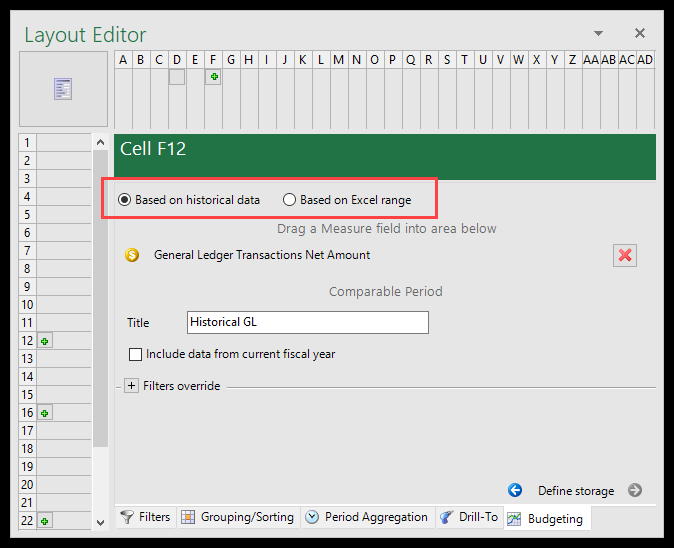
When using the Based on historical data option, you must do the following:
- Drag a Measure field, such as posted amount, into the top part of the window as shown in the example below.
- Enter a title for the comparable data in the Title
- Select or deselect the Include data from current fiscal year checkbox: If you select this option, the current fiscal year and the previous year will be included (depending on the selected period parameter you run the budget for). If left blank, you will get the two previous years.
NOTE: In the description above, only the period dimension is mentioned. Other dimensions that are used for selecting the Comparable data are inherited from the selections used in the template. If you want to override those selections, you can drag in dimensions from the module list and drop them in the section called Filters override. This is an advanced feature and should be used with care.