The Solver Data Warehouse provides a friendly user interface to create and maintain a database application for financial and operational reporting and planning. With minimal experience in data warehousing, users can quickly create a database solution storing financial data and make customizations to this data for reporting purposes. Import other types of data to do financial reporting on operational data to get additional information on how your business is operating.
Highlighted Features and Functionality
The Data Warehouse comes with the following key features
- Solver allows for up to 1000 custom dimensions. This is denoted as d_Dim999.
- Solver allows for unlimited number of modules
- Solver supports an unlimited dimension codes to one dimension.
- Consolidation and currency translation processes
- Business rules (XML files) that perform additional transformations
- Single, global fiscal calendar
- Pre-build connectors to many systems.
Menu and Interface
The Data Warehouse consists of 5 submenus for specific tasks.
- Overview: Displays the modules and dimensions that have been created by your organization.
- Dimensions by Module: Displays the list of modules and the dimensions assigned to each one
- Modules by Dimension: A listing of all dimensions and the modules they are assigned to. This view may show dimensions not visible on the Dimensions by Module view because they are not assigned to any module.
- Currency: within the currency menu are three submenus for Rate Types, Rate Configuration and Monthly Rates.
- Rate Types
- Rate Configuration
- Monthly Rates
- Data Explorer: view data that has been uploaded into Solver. Data Explorer provides unrestricted access to data and is not tied to permissions set in Data Access. Permissions can be assigned to this menu, giving you control of who can access this menu
- Data: within the Data menu are four submenus to help you import data into Solver.
- Integrations: A listing of integrations from a source system into Solver
- Rules: Custom process created by you or a consultant to do additional transformations of data after the data has been loaded into Solver.
- Jobs: Group and bundle the integration and rules into a job and schedule them to run throughout the day via the jobs menu.
- Event Log: view the last 30 days of job & integration executions. View error details when your integrations fail to complete for troubleshooting purposes.
- You may request additional days back by submitting a request to Solver Support.
- Configuration: consisting of five submenus, use these menus to do the initial configuration of the Data Warehouse and maintenance at any time.
- Modules: View and maintain modules and their attributes.
- Dimensions: View and maintain dimensions and their attributes.
- Modules Schema: Assign dimensions to the modules that have been created.
- Period Configuration: define the periods that will be used in Solver.
- API: enable the API, allowing you to connect Solver to Power BI, Tableau or any other source that can accept an OData feed.
Configure your Data Warehouse
Configuring your Data Warehouse includes the following steps
- Create your fiscal calendar
- Create your modules and dimensions
- Import your data
NOTE: The following sections require that the logged-in user has been assigned Can Manage Configuration permissions. Please reference this article for more details on permissions.
Create Your Fiscal Calendar
An organization’s fiscal calendar is one of the first tasks that needs to be completed in the Solver product. Solver’s advanced period configuration wizard is fully customizable to meet almost any fiscal configuration. The wizard supports the following configurations:
- Standard 12-period calendars. Begin on Jan 1st and end on Dec 31st where each month represents a period
- 4-4-5, 4-5-4, 5-4-4 period configurations
- Many non-standard, “fiscal” configurations
- 13-53 Period configurations
The one configuration that Solver’s period wizard does not support multiple fiscal calendars. For these configurations, please contact Solver Support (support@solverglobal.com).
Creating and Maintaining Periods
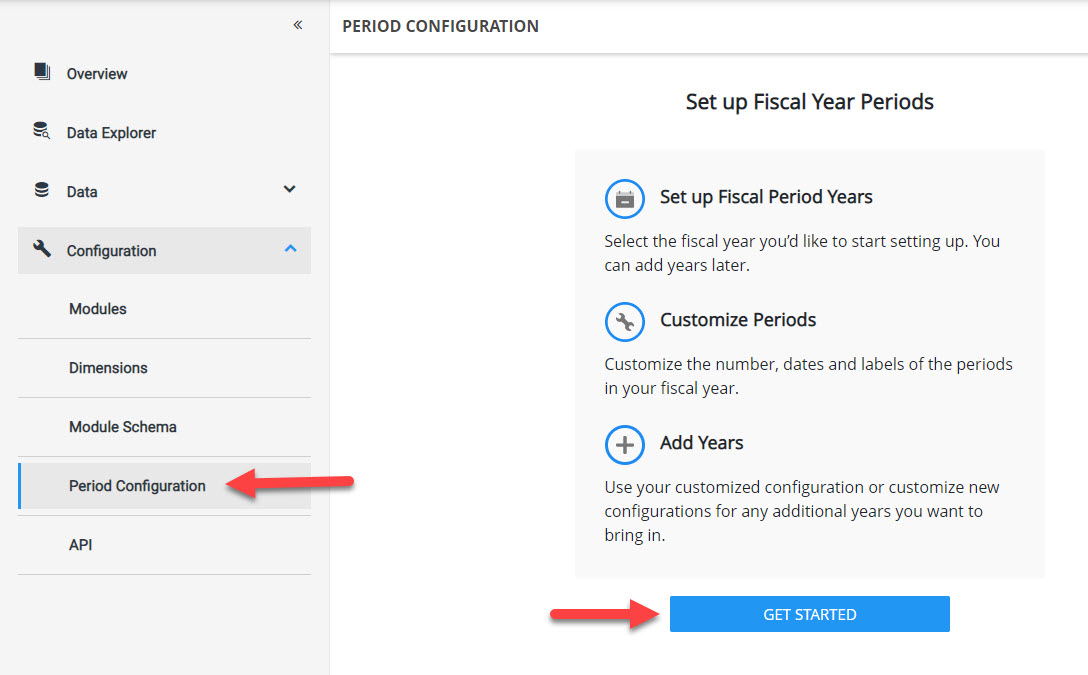
Upon logging into Solver and navigating to the Data Warehouse menu, if periods are not configured, on the Overview page, users are informed to configure their periods. Click the Period Configuration link to begin

- The Period Configuration wizard starts by providing a brief overview of the steps. Click Get Started to begin.
- A popup will appear asking users to select the first fiscal year to configure. This is typically going to be only a couple years prior to the current calendar year, in order to load historical data. If you are unsure, you can always add years later.

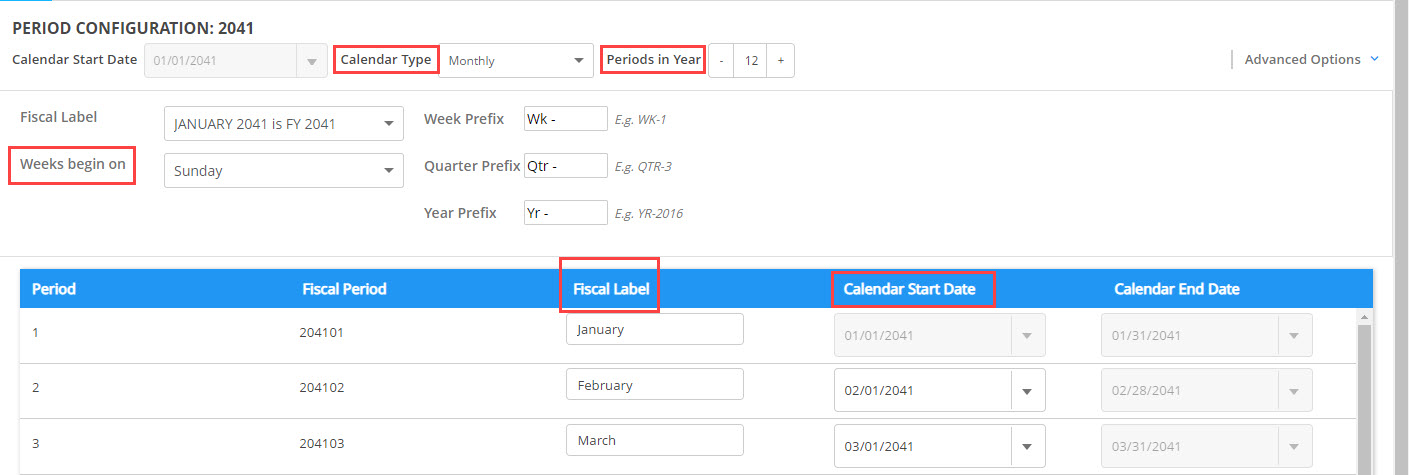
- After clicking Continue, the fiscal year configuration will appear. It defaults to a standard calendar configuration where each period is representative of its respective month (ie the month of January represents Period 1). Users have the ability to change the following
- Number of periods per year.
- Period labels (January, February…)
- Calendar start dates
- Calendar type
- Weekday when the fiscal week begins
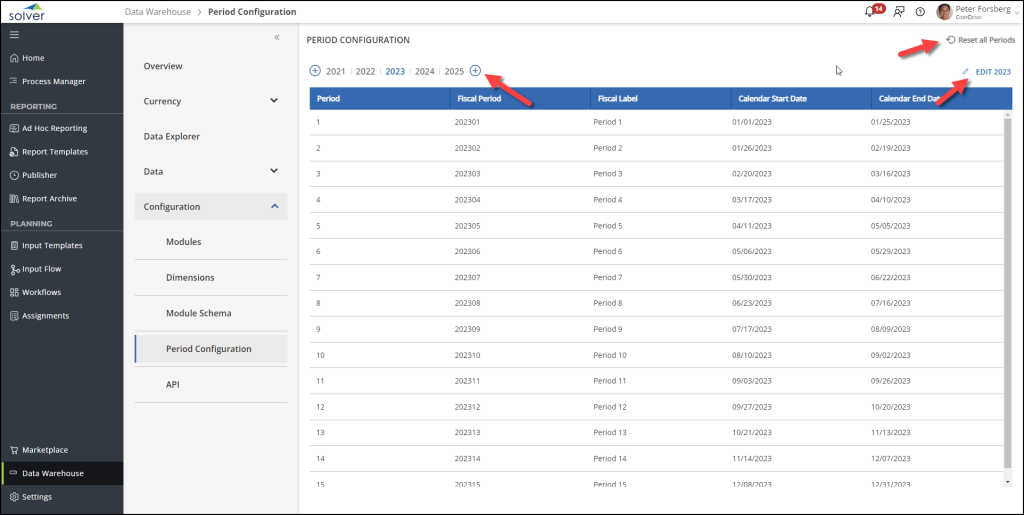
- After configuring your periods as needed, click Create Periods in the bottom right-hand corner. This will create your first fiscal year. There are some action buttons to be aware of here.
- Reset all Periods: This button only appears when there is no data in the database. Click this button if you need to reset the entire Period configuration
- + icons: Add prior years or years into the future. Users are able to add up to 10 years at one time. Upon clicking the + icon a drop down will appear allowing the user to select up to 10 years. Once an option is clicked, the screen will refresh with the number of years to be added.
- Edit YYYY: Click this icon to edit the selected fiscal year (in blue text). Within editing a select fiscal year, users will also have the option to delete that specific fiscal year. This action is found in the bottom right hand corner of the Edit YYYY screen. Note that this individual fiscal year deletion functionality is only available for the very first or most recent fiscal year.
Adding Fiscal Years
Users are able to add up to 10 years at one time.
To add fiscal years to Solver
- Navigate to Period Configuration.
- Click the + icon next to the years configured in your Period Configuration.
- Upon clicking the + icon a drop-down will appear allowing the user to select up to 10 years.
- Once an option is clicked, the screen will refresh with the number of years to be added.
The generated periods inherit the most recent fiscal configuration and are automatically saved. If you need to modify the calendar simply click Edit to make changes to the configuration.
Deleting Periods
Users may delete fiscal years from within the Period Configuration window. Users may delete a fiscal year once all data associated with the fiscal year is removed from your Solver tenant. This data can be found in any of the modules you have created. Users must delete the most recent year(s) first.
To delete periods
- Navigate to Period Configuration
- In the upper left-hand click the most recent fiscal year that has been created and click Edit to the right.
- In the bottom left-hand corner will be the option to delete periods.
- A popup will confirm this action. Click Yes, Delete to delete the fiscal year or No, Cancel to exit
Creating Modules and Attributes
Modules, also referred to as factsets, store your transaction information such as General Ledger and General Ledger Detail. Solver comes with these two modules out of the box with the ability to create an unlimited number of modules. At the very top of the Configuration > Modules menu, users will see a count of the number of modules that have been created.
Creating a Module
To create a new Module:
- Navigate to Data Warehouse > Configuration > Modules
- Click on the (+) icon.
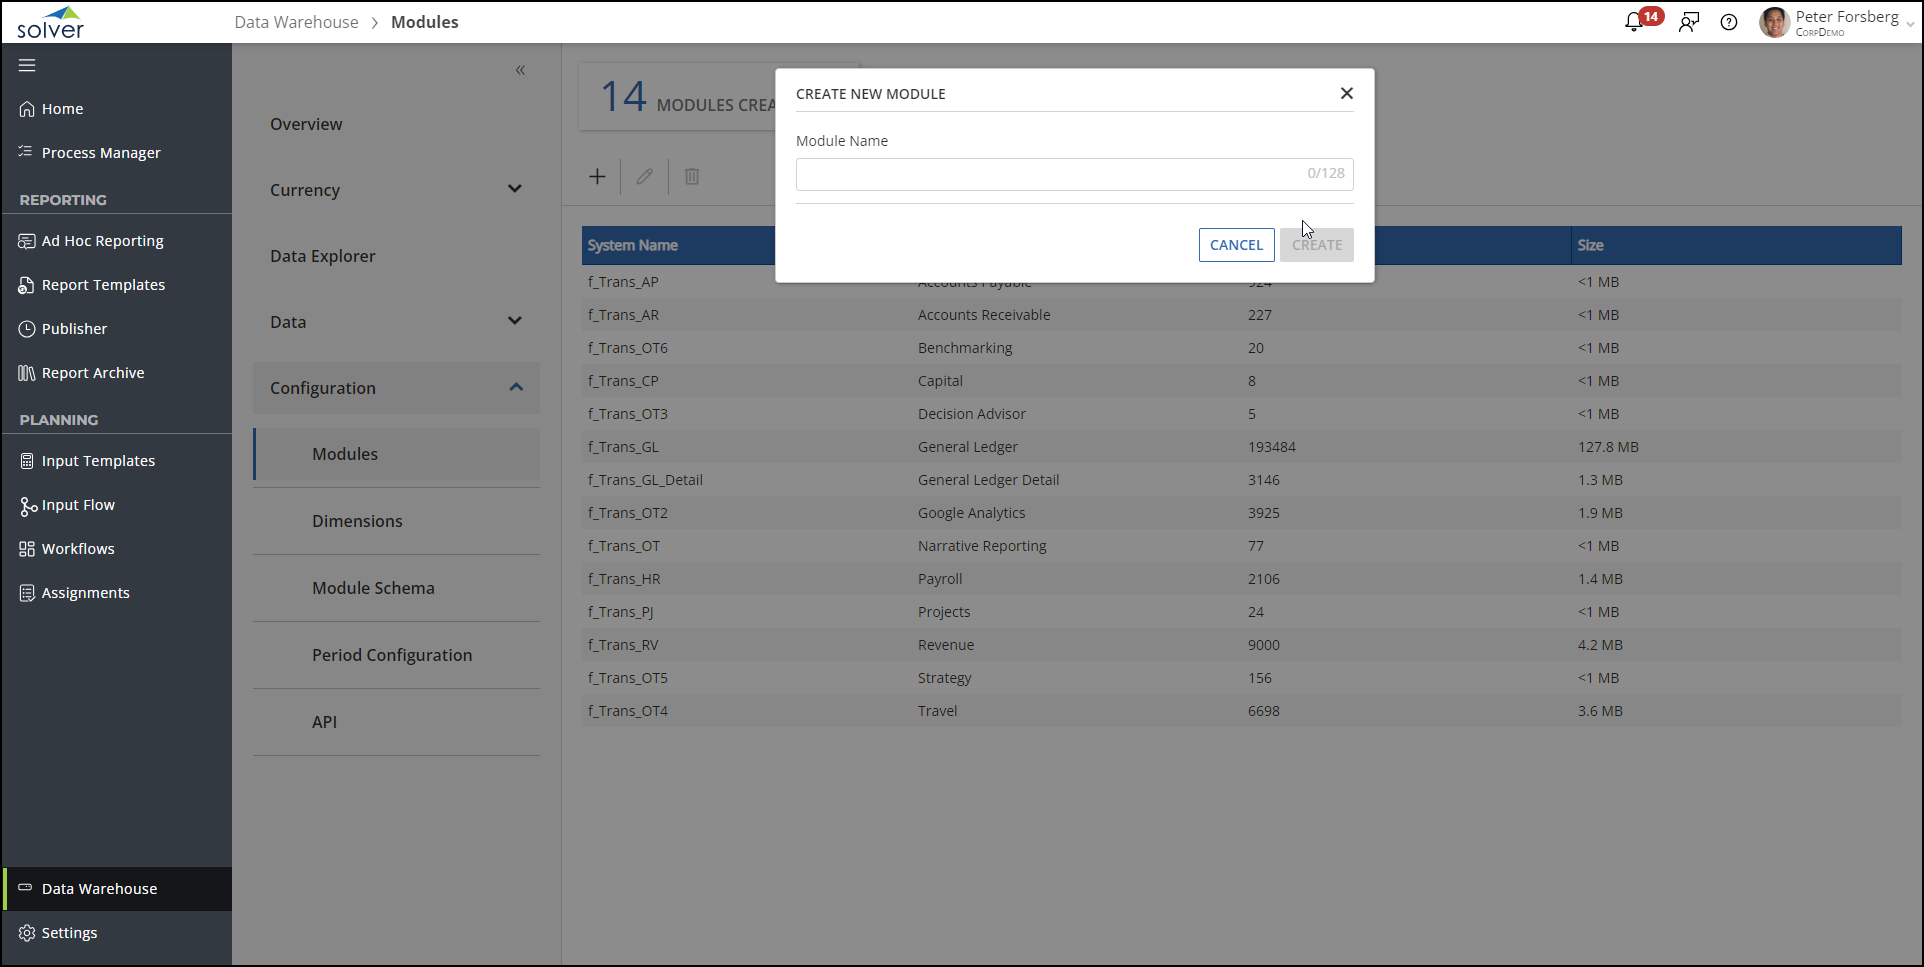
- In the popup that appears, type in the module name and click Create
- Module names are limited to 128 characters and should not include any special characters beside dash, underscores and spaces
- The application will create the module. The user will be taken to the module attribute page.
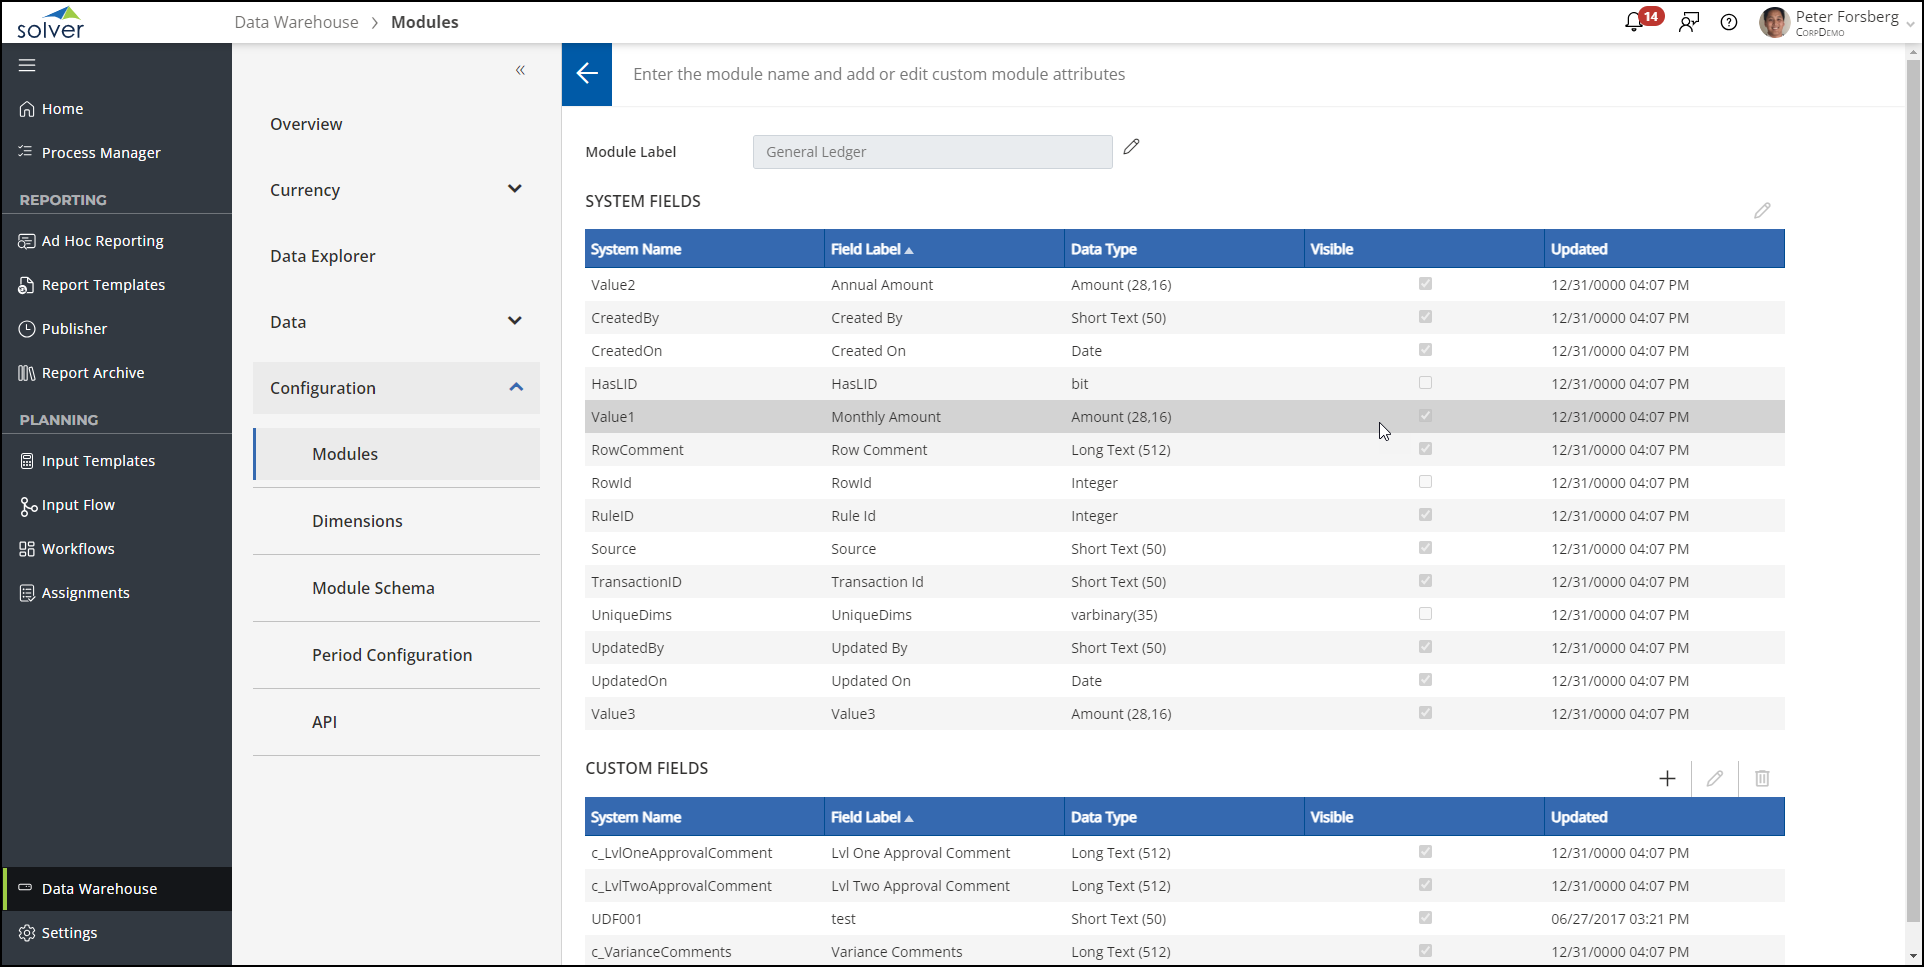
- The attributes page will list all default attributes for the selected module in the top half of the screen. The labels, custom names you define, are modifyable but the attributes in this section cannot be deleted.
The bottom half of the menu shows attributes that have been created by users in your tenant. These custom attributes may be edited or deleted by anyone with Can manage configuration permissions.
- Editing field names will appear throughout the app upon refreshing or reloading the application.
- Deleting attributes will be removed from the application immediately. Deleting attributes may result in reporting errors so make sure to check with your report writers that it is okay to delete these attributes.
Module Attributes
The Module Attributes page is where users customize the different data associated with existing modules. The three customizable areas are:
- System Fields
- Custom Fields
System Fields
The system fields section shows all the default system attributes found for the current module being edited. Each attribute contains the following details:
- System Name: Displays the database name for the particular system attribute.
- Field Label: Displays the friendly name seen in the Solver Portal for the particular system attribute.
- Data Type: Describes the type of data the particular system attribute can carry.
- Visible: Describes whether the particular system attribute can be seen in the Solver Portal.
- Updated: Describes when the particular system attribute was last modified.
To make edits to system attributes:
- Select the desired system attribute and click Edit.
- The Edit System Attribute Field modal appears. Enter a new name in the Field Label text box if making a change to the label seen in the Solver Portal.
- Select/deselect the Visible checkbox as desired to adjust whether this system attribute is seen in the Solver Portal.
- Click Save to close the modal and apply the new changes to the selected system attribute. Click Cancel to close the modal and discard the changes made to the selected system attribute.
Custom Fields
The custom fields section shows all the custom attributes found for the current module being edited. Each attribute contains the following details:
- System Name: Displays the database name for the particular custom attribute.
- Field Label: Displays the friendly name seen in the Solver Portal for the particular custom attribute.
- Data Type: Describes the type of data the particular custom attribute can carry.
- Visible: Describes whether the particular custom attribute can be seen in the Solver Portal.
- Updated: Describes when the particular custom attribute was last modified.
Creating a Module Attribute
- Click Add.
- The Create Module Attribute Field modal appears. Enter a new name in the Field Label text box. This name will be displayed in the Solver Portal.
- Select the Data Type dropdown to see the available data types. Click on the desired data type this attribute will carry.
- Note that once created and saved, the Data Type dropdown cannot be modified. Ensure the desired data type is selected before continuing.
- Select/deselect the Visible checkbox as desired to adjust whether this custom attribute is seen in the Solver Portal.
- Click Save to close the modal and create the new attribute. Click Cancel to close the modal and stop the new attribute creation.
Edit a Module Attribute
- Select any custom attribute and click Edit.
- The Edit Module Attribute Field modal appears. Enter a new name in the Field Label text box if changing the custom attribute name. This name will be displayed in the Solver Portal.
- Select/deselect the Visible checkbox as desired to adjust whether this custom attribute is seen in the Solver Portal.
- Click Save to close the modal and save the new changes made to the custom attribute. Click Cancel to close the modal and discard the changes made to the custom attribute.
Delete an Attribute
- Select any custom attribute and click Delete.
- The Delete Custom Module Attribute modal appears.
- Click Save to close the modal. The custom attribute will no longer appear in the Custom Fields table.
- Click Cancel to close the modal without deleting the custom attribute. Confirm that the attribute is still seen in the Custom Fields table
Modifying a Module
To modify the details for a module:
- From the Configuration -> Modules screen, select the desired module to be edited.
- Click on the pencil icon
- The user will be taken to the module attributes page, where they can edit the details of this module such as label names and existing module attributes.
Deleting a Module
Deleting a module will delete all of the data in the module and is a non-reversible action.
- From the Configuration -> Modules screen, select the module to be deleted.
- Click on the trash can icon.
- A popup will appear confirming the action to delete the module. Click Delete to delete the module.
The module will no longer appear in the list and has been successfully removed from the application.
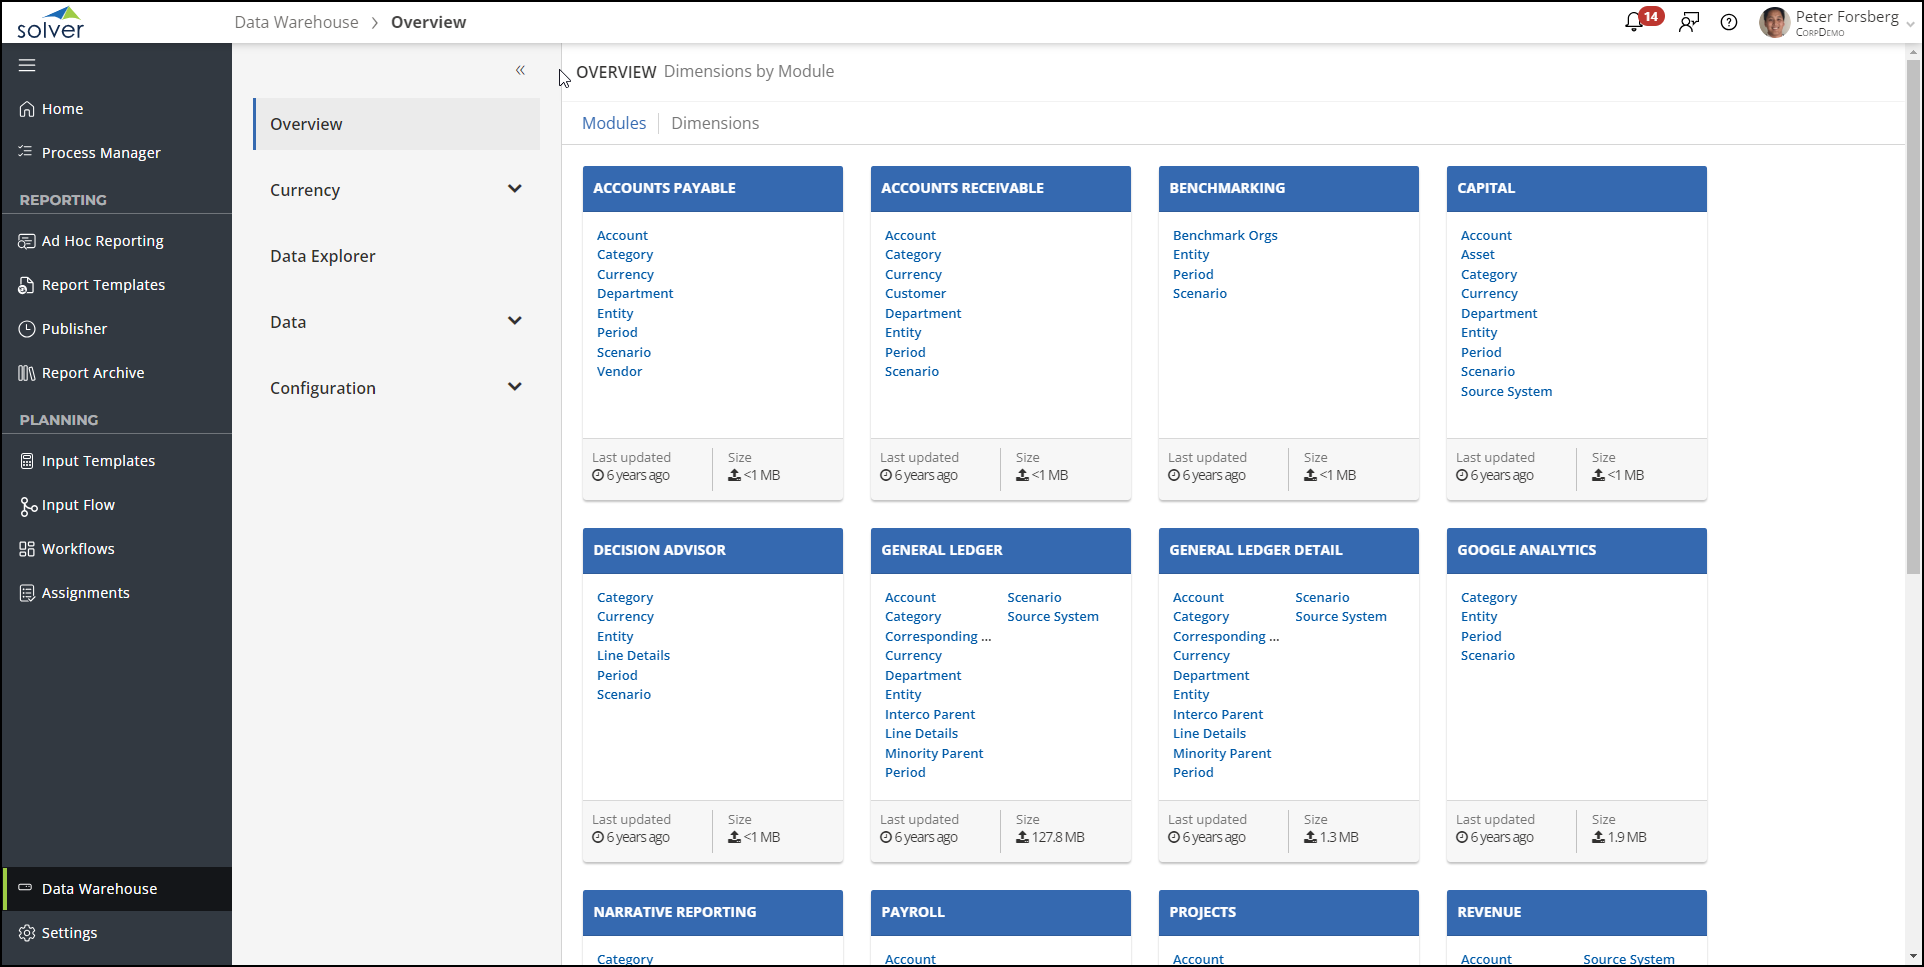
Overview Screen
Once you have set up your data warehouse and completed an integration, your data will be viewable on the Overview page. This page organizes your data into tables by modules and dimensions and gives you the ability to view a specific area of your data warehouse.
Data Explorer
Data explorer allows users to query for data in Solver. Typically this menu is used by technical resources to quickly verify that data has successfully loaded into Solver. Data Explorer allows users to
- Easily view data in your Solver tenant
- Delete Data from your Solver tenant
Data Explorer displays only 10,000 rows. Use filters to find the specific transactions you are looking for. If you need to view more than 10,000 rows of data, you will need to be granted permissions to Ad Hoc Reporting.
Data Explorer is a full data permissions feature. Access to this menu should be given to select users who can see all data inside solver.
Deleting Data
To delete data from Data Explorer
- Navigate to Data Warehouse > Data Explorer
- Filter for the data you would like to delete
- Select the row(s) of data you would like to delete
- Click the delete button at the top of the page.
- A popup will appear confirming that you want to delete the data, click Ok to continue.