This article will detail how to build and maintain your integrations. The steps listed in this article will be for Business Central but can be applied to any connector.
Menu and Interface
Creating an integration starts from Data Warehouse > Data. Users must be granted Permissions in order to see this menu item and its content.
In the Data menu there are four (4) sub menus
- Integrations: Create and maintain integrations to various data sources. This screen will list all integrations that have been created.
- The action bar contains a couple multiple actions
- Primary Action Bar
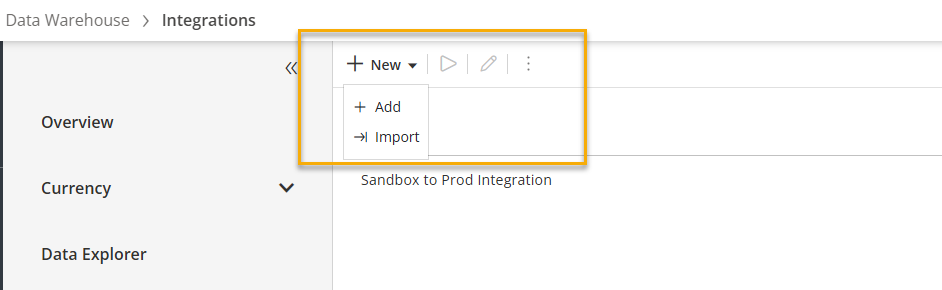
- New > Add: Opens the Connector Marketplace
- New > Import: Import an existing Integration file
- Run > Run the integration
- Edit > Edit the integratino
- Options (active upon selecting an integration)
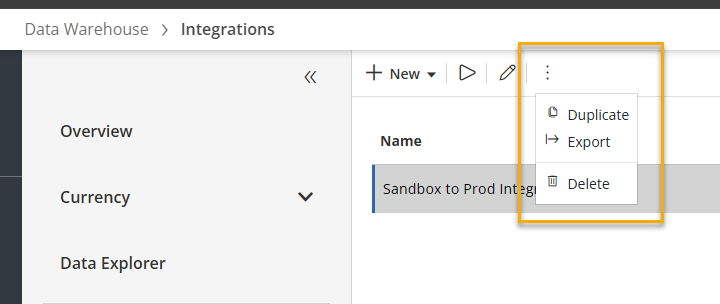
- Duplicate: Duplicate the integrations. You will need to retype in the credentials
- Export: Export the integration file.
- Delete: Delete the integrations. This is a permanent action and cannot be undone. Upon clicking Delete, a confirmation window will appear asking you to confirm deleting the integrations.
Click Delete to delete the integration, click Cancel to Exit the prompt and not delete the integration.
- Primary Action Bar
- The action bar contains a couple multiple actions
- Rules: Rules are store procedures that are ran independently or with integrations. A stored procedure can do addition transformations or business logic based off your data needs.
- Jobs: Create and maintain a job, one or multiple steps in a data load process. A step can be a rule or an integration. Additionally, a user can set a schedule and send email notifications on job completion or failure.
- Event Log: A detailed list of the last 30 days of all Integrations, Rules and Jobs. Additionally, the event log displays log information such as why a data load process may not have been successful.
Integrations
An integration is a configured data load from your source system to Solver. An integration users a Solver “Connector” to make data available to the user to map from the source system to the target, Solver. There are two ways to create an integration:
- Solver QuickStart for supported ERPs and data
- Manual Creation
An integration can be made of a single step or multiple steps. Solver’s star schema requires that the dimensions of a transaction are loaded into Solver prior to transaction (fact) data. To ensure this, Solver always processes dimension steps first, prior to any module step, even if they are ordered differently in your configuration.
Best Practices
A couple best practices when configuring your integration
- If available, use Solver’s QuickStart to quickly get up and running with a data load to supported systems.
- It is recommended that each integration has a single step, this will make troubleshooting slightly simpler.
- For module loads, always include the Period as a parameter.
- Available parameters are based off the dimension steps in an integration. By default, period is always available but by creating a step for a department data load in the same integration as a General Ledger module load, department becomes a parameter as well.
- Internal Id’s, which are common in operational data, is better to use if operational codes can be changed. Internal Ids are a bit more challenging because these are typically incrementing integers that have no finance meaning.
- It is recommended to always connect Solver to your system using a service account. Using an actual user’s account can result in permission issues and integrations to stop working should that authenticated user be removed from the financial system.
Create your First Integration
Creating an integration can involved multiple steps depending on the complexity of your data. To create an integration.
- Navigate to Data Warehouse > Data > Integrations.
- A listing of all integrations will appear.
- Click New > Add button from the action bar.
- Solver’s Connector Marketplace will load. Find the product that you are looking to integrate with. Click on the logo to expand the details and to display the option to Create Manual.
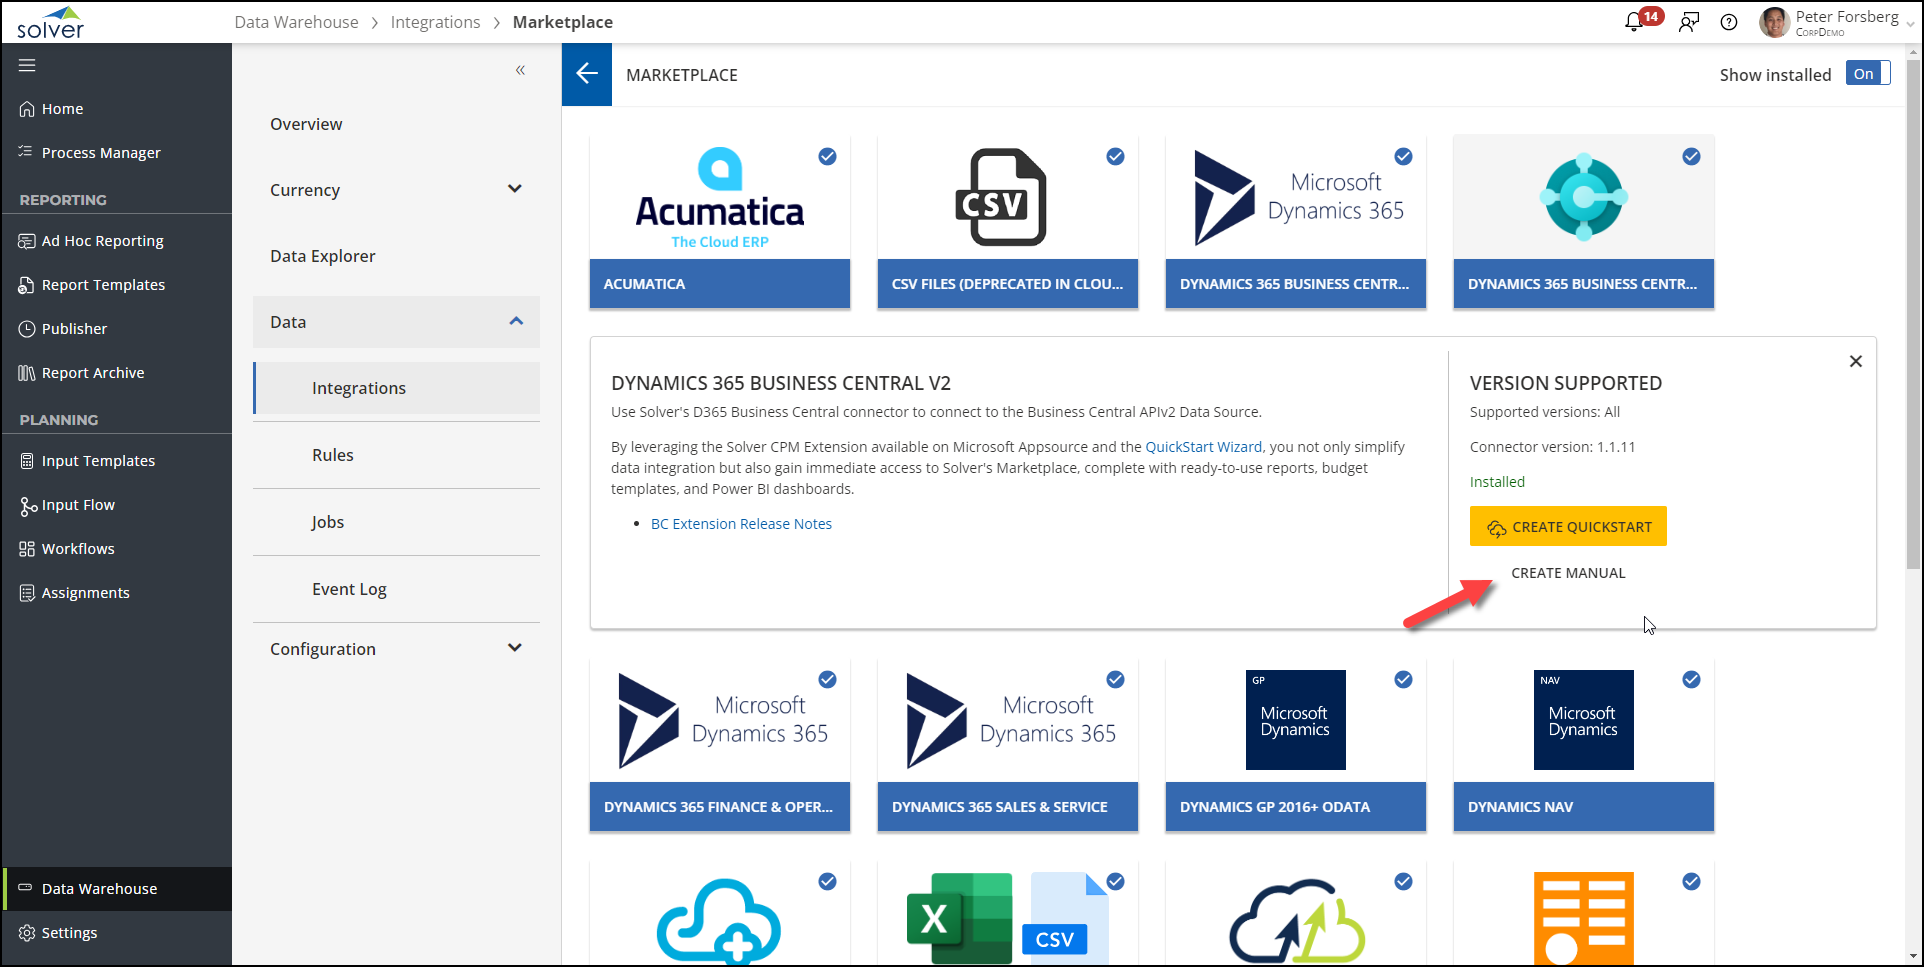
- The authentication option(s) will appear. Depending on the connector, one or multiple options will be shown.
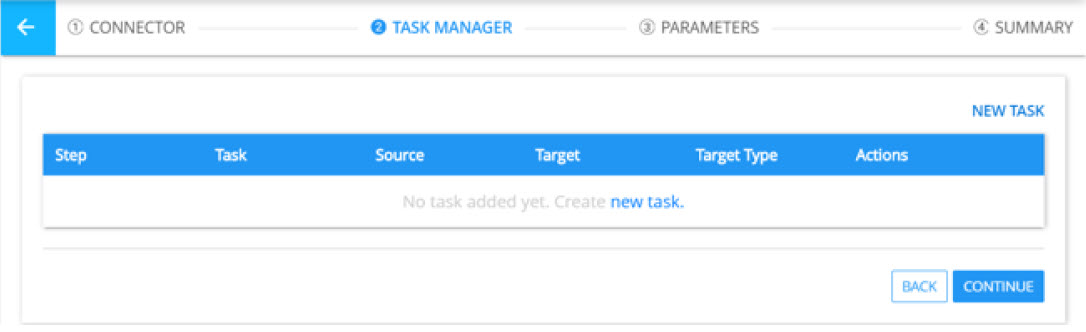
Follow our relevant user guide for details on configuring an account that can be used to extract data into Solver. - Once successfully authenticated, users will be guide to the Integration Tasks screen where users create the tasks of the integration. Tasks, as discussed above, are the data that needs to be brought into Solver.
- To create your first step, click New Task.
- To create a task, users must provide the following information.
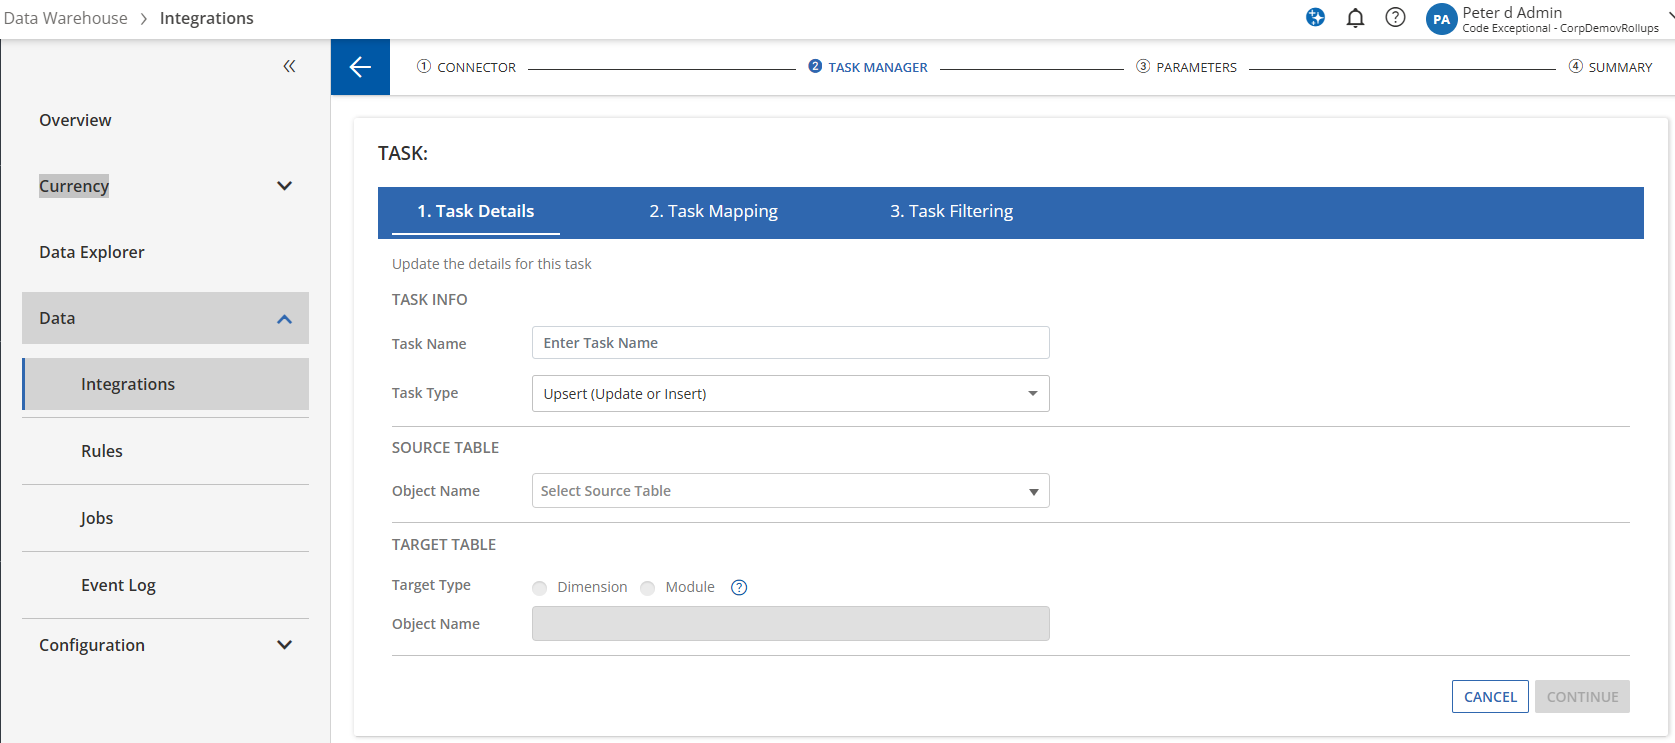
- Task Name: a descriptive title of the task you are creating. This can be something like “Account Dimension”
- Task Type: this defines how data is imported into Solver.
- Insert: this will only insert new transactions that exist in the source but not in Solver.
- Update: this will only update matching transactions that exist in the source and in Solver.
- Upsert
- For module tasks this is currently performing a delete and insert; deleting all transactions in Solver that match the data being imported into Solver.
- For dimension tasks, this option is performing a proper upsert, updating dimensions if the code already exists in Solver and inserting the dimension code if the dimension code does not exist.
- Source Table: this drop down displays all available objects based off the permissions of the user used to authenticated.
- In many API systems, it is common that generic permissions grant permissions to see all API endpoints. However, this does not mean that the account has permissions to see the data of the selected source object and additional permissions may be needed.
- Target Type: Choose between a Dimension or a Module.
- Target Table: Based off the selected Target Type, target object populates with the option to create a new dimension/module or choose an existing one.
- When choosing an existing Module, users will also have the option to see the dimensions of the Module. Users can click the checkbox to add more dimensions to this module, if needed.
- Once completed, click Continue.
- On the next screen
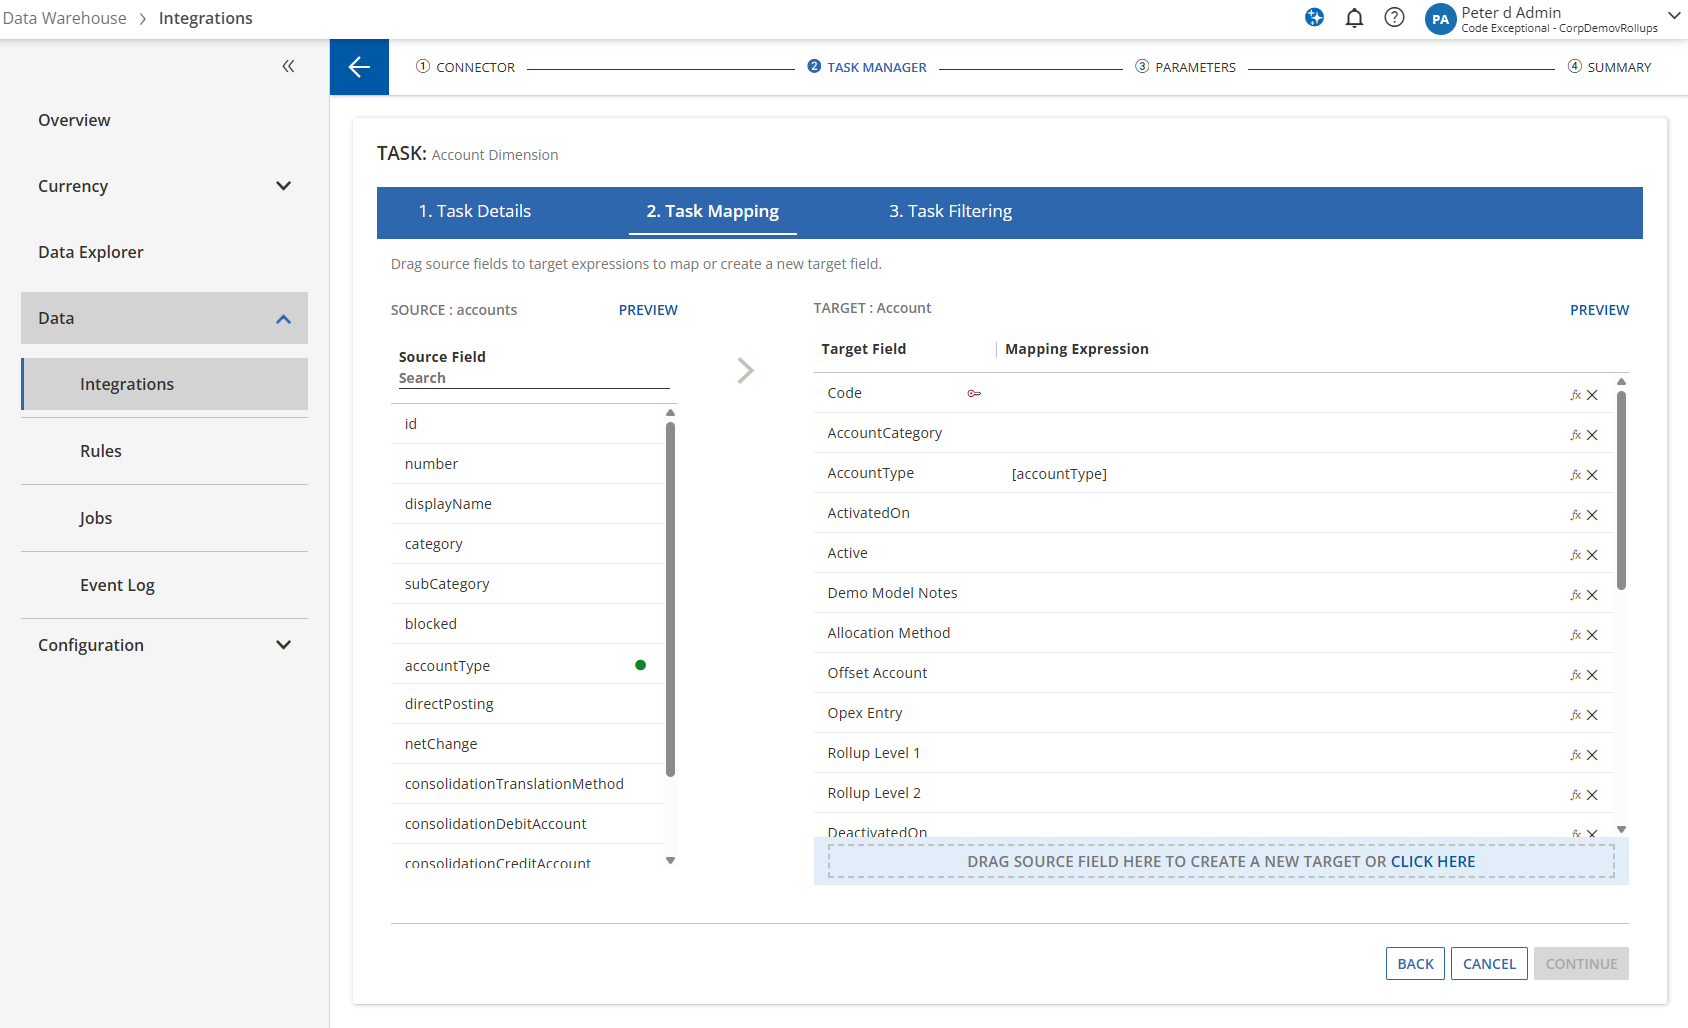
- On the left hand side of the screen, the fields on the previously selected Source Table will appear.
- Clicking Preview will display the top 200 transactions for the selected Source object.
- On the right hand side of the screen, the fields of the Target Table will appear.
- Clicking Preview will display the top 200 transactions based off the mapped fields, including the results of any expressions that were applied.
- The red key icon indicates a mandatory that must be mapped. For dimensions, this must be a unique value.
- On the left hand side of the screen, the fields on the previously selected Source Table will appear.
- Fields that syntatically match between the source and target side are automatically mapped. Using a drag and drop experience, drag the fields from the left hand side to the right hand side that you want to bring into Solver.
- It is not required to map all source side fields into Solver.
- If the right hand side does not list an attribute with a name that represents the data you are trying to bring into Solver, drag the field from the left hand side into the blue bar at the bottom of the target side.
- A popup will appear allowing users to create a new attribute on the dimension or module.
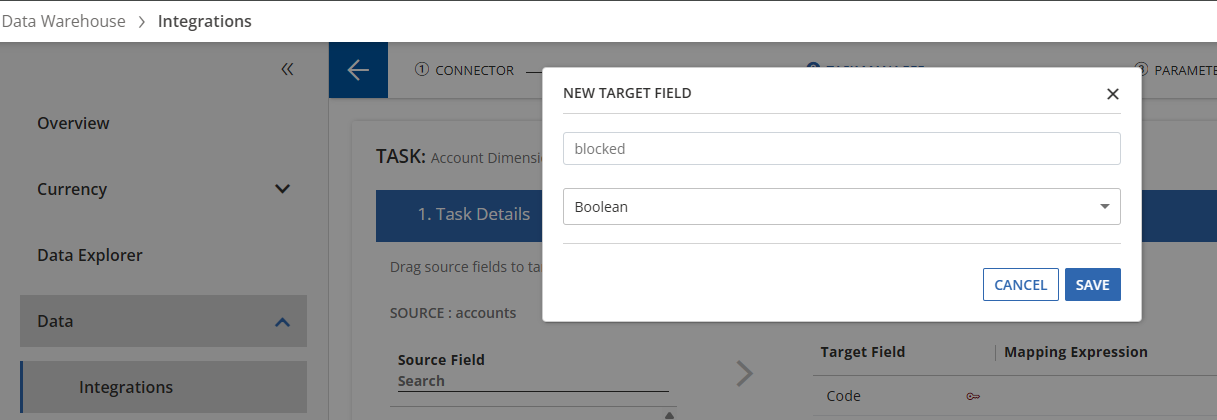
- Attribute Name: the name of the attribute you dragged in will appear as the default name. This can be edited.
- Data Type: Solver will present the data type it thinks the mapped field is. However, users can click the dropdown and choose the data type that represents the field being added.
- Click Save.
- The next screen is the task filtering screen. If necessary, apply a filter specific to this data.
- Drag the field from the left hand side to the right hand side to be used as a filter.
- Once dragged over, type in the value (case-sensitive) for the filter to be applied.
- Repeat the process to add more filters.
- Once complete, click Save.
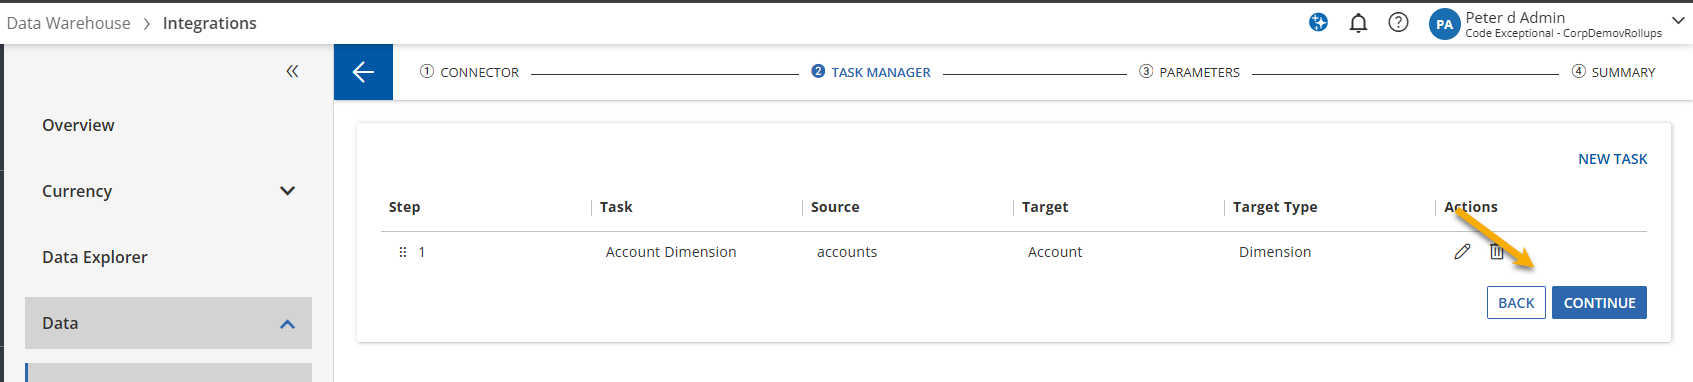
- This completes the task creation process. As mentioned in best practices, it is recommended to keep integrations to a single task, however, users can repeat the above process within this integration, adding more tasks.
- Once you have completed the data that should come in with via this integration, click Continue.
- On the next screen,
- If a module task exists, the period parameter and any dimension tasks will appear on the left hand side. If any of these dimensions should be a value that the users provides when running the integration, drag it to the right hand side of the screen.
- If your integration consists of only dimension tasks, you can click Continue.
- On the final screen, users can define the integration name and Publish the integration
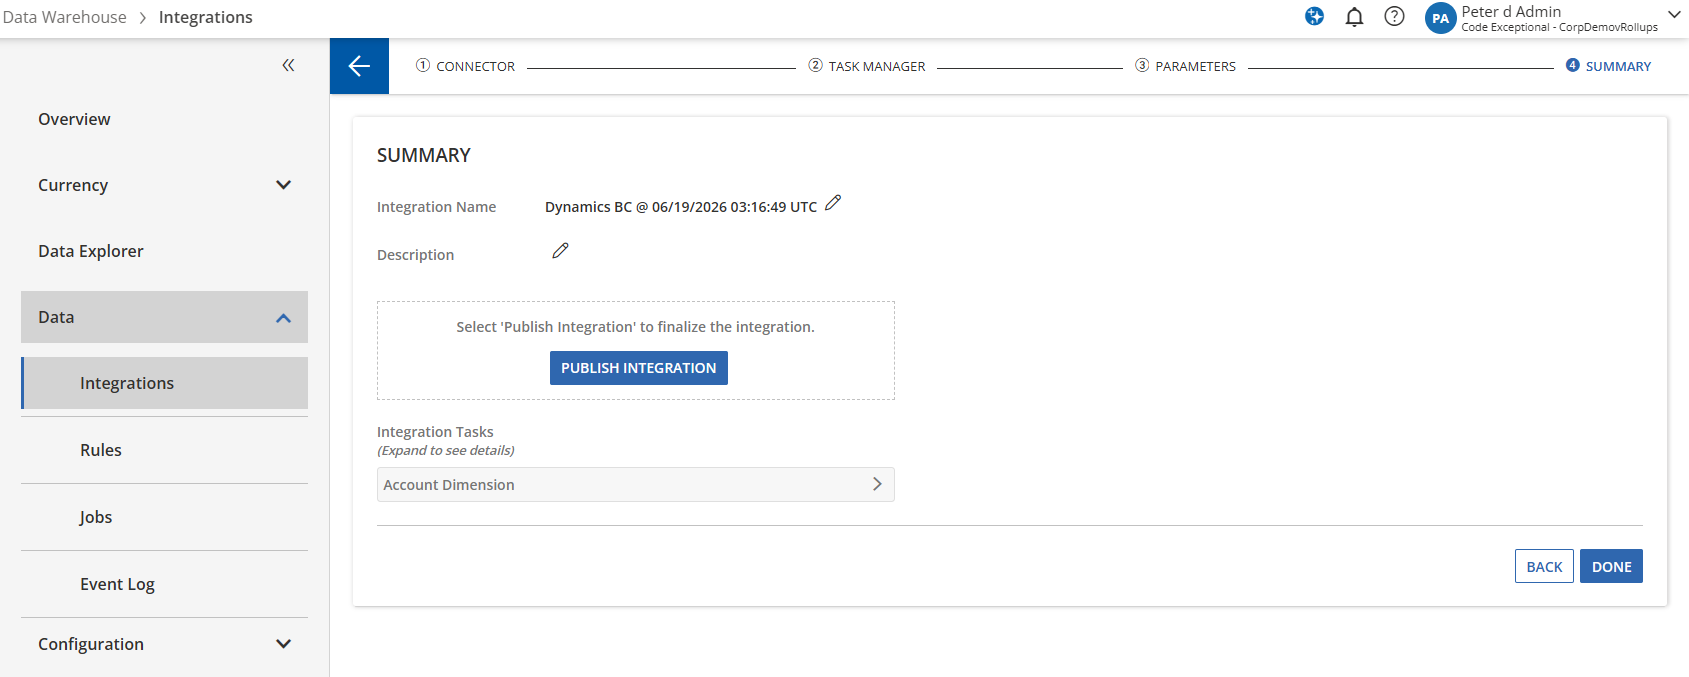
- Integration Name: a descriptive name of the integration that users will see throughout the application.
- Description: a longer description of the integration, only visible when creating and integration
- Publish Integration: click this button to make your changes permanent. Until this button is clicked, this integration is considered in draft mode and the configuration has not been applied to the tenant.
After clicking Publish, users will get confirmation that the changes have been applied and can click Save in the bottom right hand corner to exit the wizard.
Users can also just click Done, in the bottom right hand corner, choosing to not click Publish Integration. This acts as a “Save”, saving your work but not Publishing the changes. This option may be preferred, if you have configured the integration but there may be one outstanding question that needs to be answered prior to making your changes permanent. - Integrations Tasks: a listing of all tasks within the integration
This completes the process to create an integration. Repeat these steps for the data you would like to bring into Solver.