This article will detail administrative configuration within Solver, including:
- User management and authentication
- Data access and management
- Security best practices
Highlighted Features and Functionality
Solver’s administrative pages provide users with complete control over the menus and data they should access. This includes
- Data Access management to define the data that users should see.
- Permissions to grant users access to specific features.
- Roles to efficiently manage data access and permissions for groups of users.
Menu and Interfaces
The Administration menu can be accessed by anyone who is a customer admin user or users with the can manage users permission toggled on. Users with these permissions will see an Administration menu option under Settings.
Users who are customer admins will see a hierarchy that lists their customer name and their tenants. Reference this article for more information on administering Customers and Tenants.
Storage and Authentication Settings
Login methods can be enforced at the customer level. Solver offers multiple authentication methods, including:
- Portal Authentication
- Entra ID Authentication
- Okta Authentication
Portal Authentication
Portal authentication is the default method of authentication. The first user, when setting up your Solver implementation, must be added via portal authentication. It is recommended to always have at least two users with Portal authentication credentials.
Portal authentication requires a username and password for sign-in.
- Your username is your email.
- Your password must be at least 6 characters.
Solver enforces a policy of 6 failed password attempts. After the 6th failed attempt, your account is locked for 30 minutes. You may contact Solver Support or your Customer Admin to request a password reset if necessary.
If you need to change your email address, please contact your Customer Administrator.
MFA
Customer Admins may also choose to enable Solver’s in-app Multi-Factor-Authentication (MFA). Solver’s MFA utilizes the Microsoft Authenticator app that must be installed on the end user’s phone. For instructions on this process, see this article.
Using Geo-blocking or IP Whitelisting with the Authenticator app for Solver is currently not available.
Microsoft Entra ID
Solver supports Microsoft Entra ID (MEID), enabling an organization to manage user access to Solver from a single location: the organization’s Microsoft Entra ID. Users can opt to log in via Microsoft Entra ID on sign-in, or this can be enforced by an administrator.
Using Microsoft Entra ID has the following advantages:
- Maintain user access to Solver through your organization’s Microsoft Entra ID.
- This does not capture any data security permissions when using the Solver app. Data Access is defined within the Solver application
- Single Sign-On (SSO) Support: This feature is native and enabled automatically, provided the user has signed in to Entra ID.
- Multi-Factor Authentication (MFA): for organizations that require and have enabled MFA on the MEID side, this is automatically required for login into Solver.
IMPORTANT: Sovler MEID integration does not inherit data security permissions defined on the Entra ID side. You must define data access, described later in this article, in Solver.
For organizations that have opted to use MEID Authentication, login issues may require assistance from your Entra ID Admin.
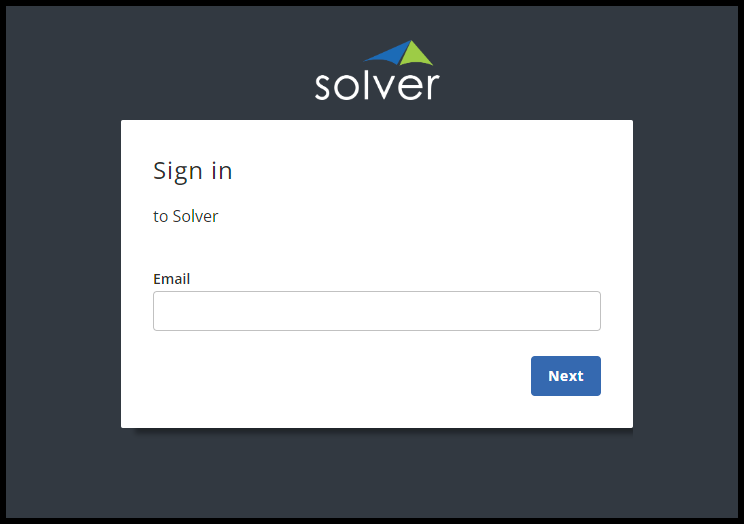
To log in with your Entra ID credentials:
- Navigate to the Solver login screen, type in your email and click Next.
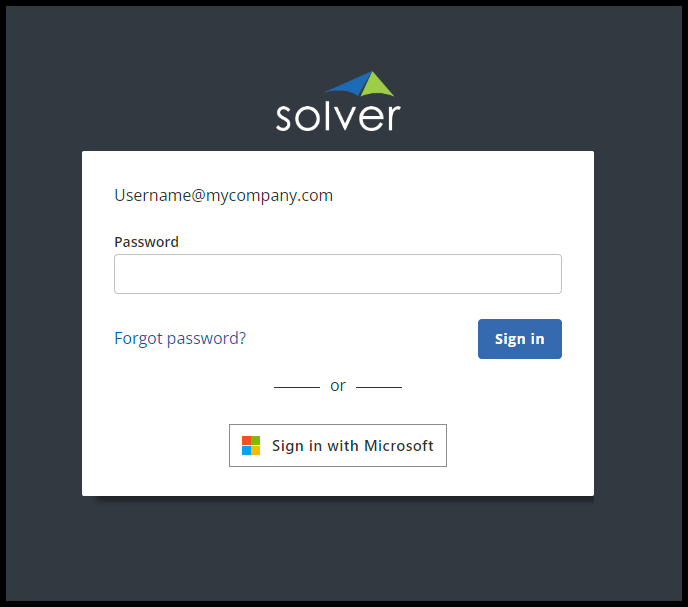
- On the password screen, choose Sign In with Microsoft.
- If you have not already logged in, a prompt will appear asking you to enter your email address.
- Organizations that have enabled MFA will be required to complete the MFA process.
- Users who have already logged into an MEID app will be automatically logged into Solver via SSO after clicking the Sign in with Microsoft button.
- If this is your first time logging in using this method, you will be prompted to accept the Terms of Service. Accept these terms and proceed with completing the login process.
Enforcing Entra ID Login
Admin users can enforce Entra ID login for users by domain. By adding an enforced domain, all existing and future users belonging to that domain will be required to authenticate using Entra ID (formally Azure Active Directory – AAD) login.
Users who do not belong to the configured Entra ID domain are not restricted by this setting and may use any supported authentication method.
NOTE: This applies automatically to both existing users and users added after the Entra ID domain has been configured.
To enforce Entra ID login:
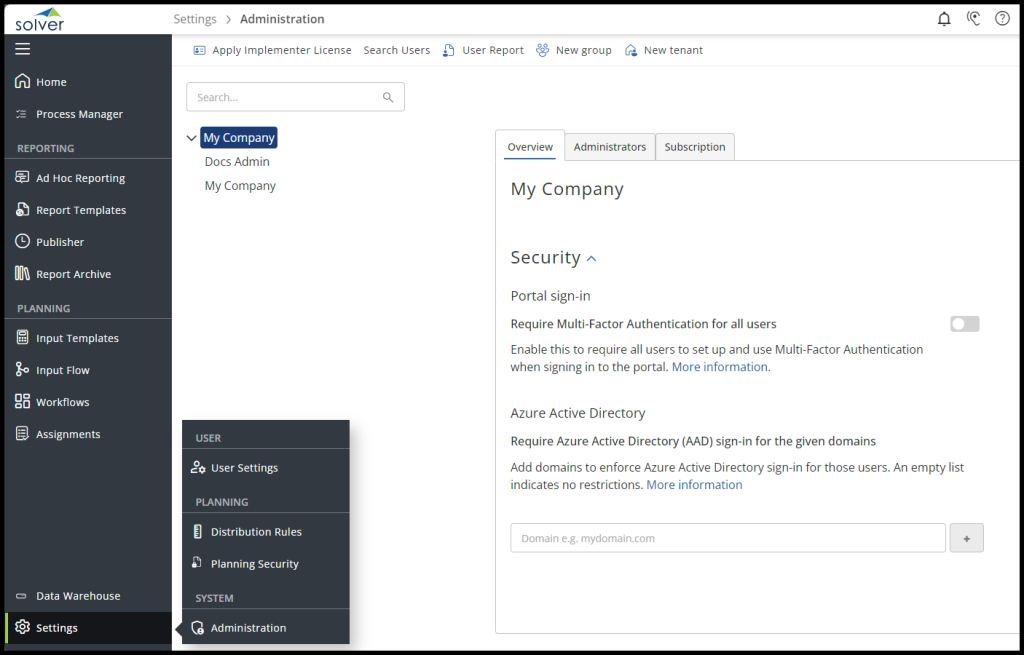
- As a customer admin, once logged in, click on Settings and select the Administration menu option.
- Select the top option on the tenant list to see the overview of your security settings.
- Type your domain name (mycompany.com) in the text box at the bottom of the overview menu and click the + icon to add it to the MEID settings.
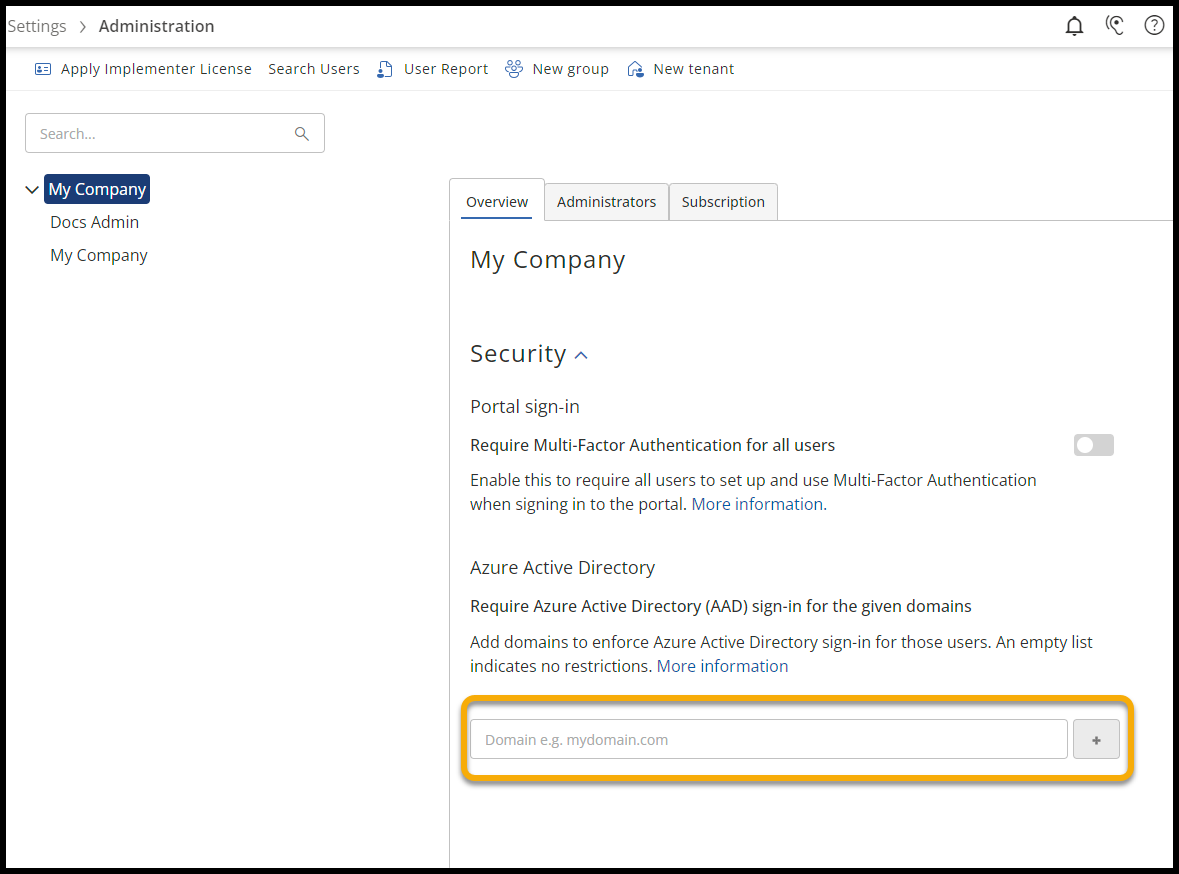
Once set up, users on this domain will only be able to log in via MEID.
- If your organization is changing domains due to acquisitions or a company name change, please contact Solver Support.
Multi-Factor Authentication
Solver Cloud supports two methods of multi-factor authentication.
- MFA as configured in your external authentication provider.
- In App (“Portal”) MFA.
MFA requires the use of the Authenticator app, which can be downloaded from the Apple App Store or Google Play Store for Android devices. Please download this app prior to setting up MFA.
External Authentication and MFA
Solver inherits an organization’s MFA settings for users logging in with Entra ID or Okta. Therefore, there are no setup requirements in Solver for organizations that are using MFA as part of their Entra ID login process.
Portal Authentication and MFA
For organizations looking to enforce MFA and are not using Entra ID, Solver Cloud offers the ability to enable an in-app MFA on login.
- Navigate to the Solver login screen and type in your email and password.
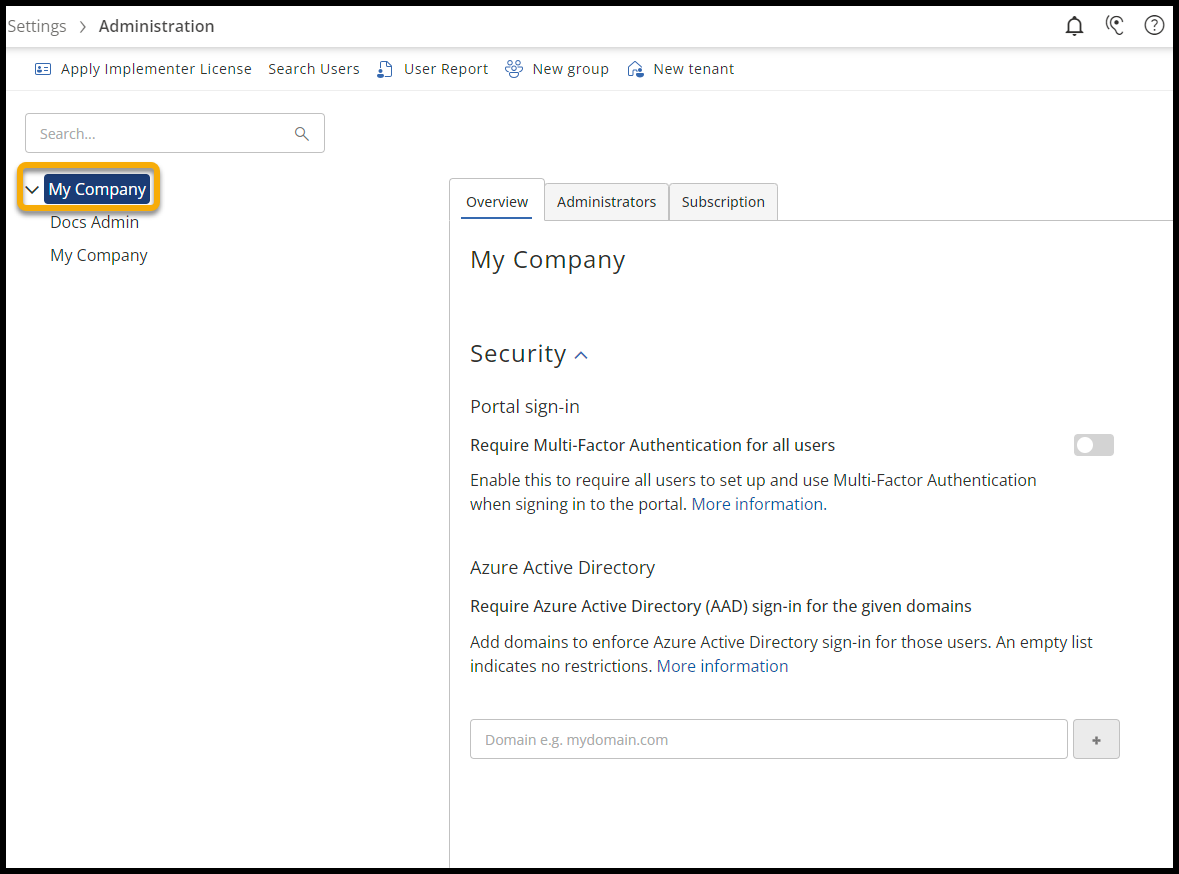
- Once logged in, click on Settings and select the Administration menu option.
- Select the top option on the tenant list to see the overview of your security settings.
- Toggle the switch next to “Require Mult-Factor Authentication for all users” to enable this setting.

This feature is only enforced for users who are portal authenticated. It cannot be used in addition to your Entra ID MFA requirement if that has already been set up.
End User Experience
Before signing into Solver, users must install the Authenticator App on their mobile device.
- Once enabled, the next time any user logs into Solver, they will be prompted with a QR code to configure MFA.
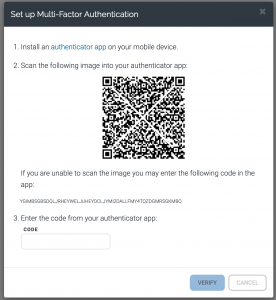
- The user can then open the Authenticator app and scan the code.
- Next, within the Authenticator app, users will be provided with an access code and will need to type this code into the text box at the bottom of the pop-up in Solver and click Verify to enable MFA on their account successfully.
- After successfully logging in, users can log out and log back in to verify that MFA is working correctly.
Resetting External Authentication Methods
This is needed when a user has rejoined the organization or changed email addresses. Under those circumstances a user might unable to authenticate using external authorization. Resetting the external authorization will allow it be created the next time the user authenticates. Resetting your external authentication can only be performed by a Customer Admin.
To do this as a Customer Admin user:
- Click on Settings from the main toolbar and select the Administration menu option.
- In the top toolbar, click Search Users
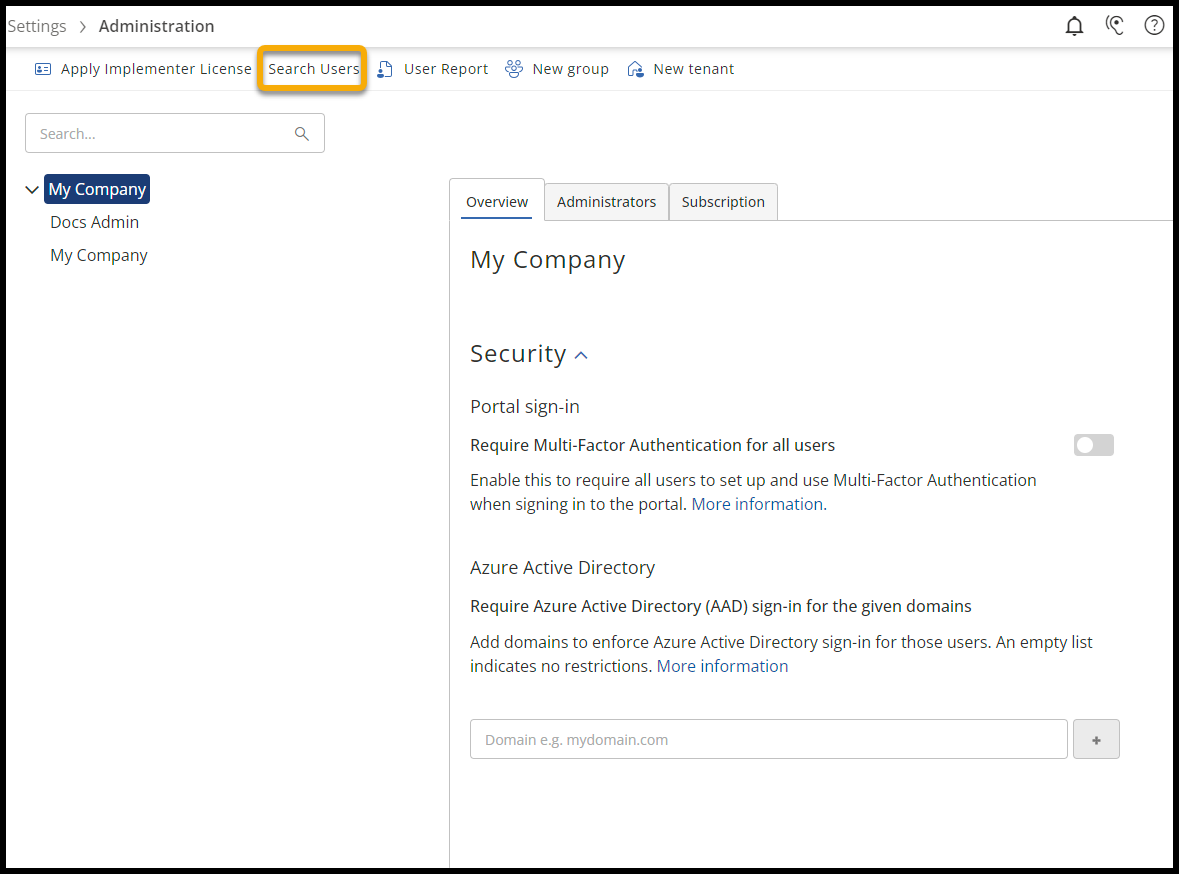
- Search for the user who needs to have their authentication reset.

- In the tile that appears with the user’s name, click Reset External Authentication.
Users will then log in normally with their external account.
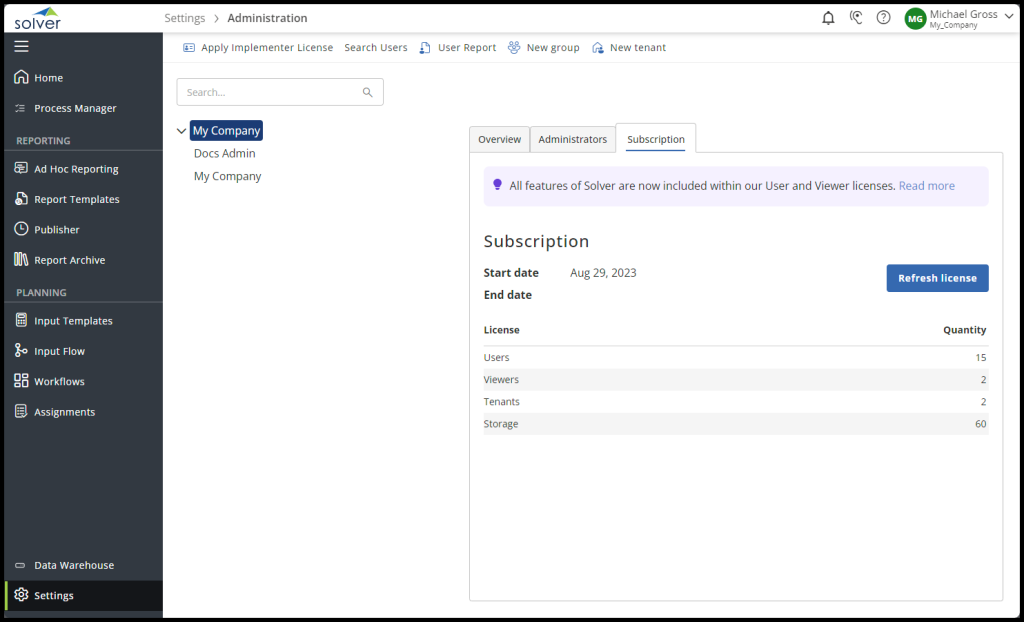
Storage
Available to customer admins, storage usage and notifications enable a user(s) to get visuals and emails as they approach their purchased storage amount.
Navigating to Settings > Administration > Storage, a visual of their total used storage and details per tenant are displayed.
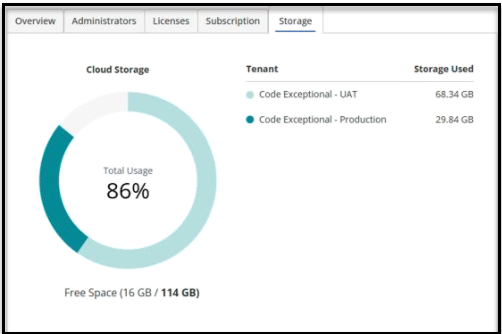
- At 90%, users will see a yellow banner warning them that they are close to their purchased storage quota. Additionally, Solver will email the customer admin(s) when you have met this milestone in your storage capacity.
- At 100% users will see a red banner warning them that they are at or have exceeded their purchased storage quota. Solver will email the customer admin(s) when you have met the cap of your storage capacity.
Purchase more storage by contacting your partner or customercare@solverglobal.com
Tenant Level Settings
Tenant-level permissions apply specifically to that tenant.
Overview
The overview section lists
- The tenant name and description. The tenant description is only visible on the administrative settings screens to admin accounts.
- Integrations: A list of integrations that are used in Solver to the underlying database(s). Integrations are sometimes referred to as “metadata” in Solver. By default, each tenant will have the Data Warehouse integration installed.
- Extension: Used on ERPs via the Hybrid Agent, Extensions allow you to customize the integration to fields that have been developed by your organization.
Add an Integration
To connect your Solver tenant to an on-premise ERP, click the Add button to install available integrations.
- The Data Warehouse integration is installed by default.
Solver development actively maintains the integrations found in the list and updates may be pushed out to customers automatically.
Deleting an Integration
Once installed, integrations cannot be deleted.
Companies
The Companies tab lists all companies connected to Solver. This list can include
- Solver Data Warehouse, which can contain one or multiple companies from your ERP.
- A listing of companies as they appear in your on-premise ERP
By default, the Data Warehouse company will be listed and is required.
Additional companies were listed and configured when the Hybrid Agent was connected. Steps to do this are described in our Hybrid Agent documentation.
Users
The users tab will detail all users added to the selected tenants. From this tab, you can add, edit, and remove users from the selected tenant. Additionally, you can view each user’s permissions from this menu.
Adding Users
The first step in allowing users to use Solver is to add their email address. To do so, as a user with Can manager user permissions
- Click on the Users tab
- In the textbox, type in the email of the user you’d like to add.
- As you type, the list will be filtered. If the email has already been added to the application, it will appear at the end.
- Click the + icon to add the user. When the + icon is clicked, an email invite is sent to the user. Users have 7 days to access the link before it expires. As an admin, you can then resend the invite.
Editing Users
To update a user’s account information, administrators may change the user’s email address or username.
- Navigate to the Users menu and locate the user’s profile in the list.
- Click the user, then select the pencil icon next to their name to edit their details.
- Enter the new username or email address, then click Save to apply the changes.
The user will receive notification emails at both their previous and new addresses about the update.
Removing Users
Users can only be removed one at a time. Prior to removing a user, it is recommended to transfer ownership of their content to another user. To remove a user
- From the Users menu, scroll through the list to find the user to be removed.
- Click the X next to the user’s name to remove the user.
- A pop-up will appear, displaying the content that belongs to the user. As mentioned above, it is recommended that this content be transferred to someone else using the transfer ownership feature.
Content can be recovered as long as the user is added to another tenant. If the user is no longer present in the system, their content cannot be recovered. - Click Remove. Click Cancel to exit the process and not remove the user.
User Details
On the user’s menu, you can view the license assigned to the user.
- On the Users menu, click on the User.
- In the grid to the right Roles, Permissions, Data Access and Feature Access menus will appear. Click on the respective item to expand it.
- License: The profile of permissions assigned to the user
Permissions
Solver offers various permissions to give specific access to the features a user should have access to.
| Permission | Description |
|---|---|
| Can create Ad Hoc reports | Grants users permission to the Ad Hoc menu to create and share Ad Hoc reports with others. Data access permissions are inherited. |
| Can download Excel files from archive | Allows users to download archive items as Excel files. |
| Can Drilldown | Allows users to access the Drilldown feature to view underlying report data in Report Designer. |
| Can manage categories | Allows users to create categories in the Report Templates and Input Templates applications. |
| Can manage Planning Security | A feature that allows some users to lock a period in order to prevent users with edit access on planning features from changing details for that period. |
| Has full data access | Allows users to have full access to all data sources for the selected tenant. This includes data sources that can be added in the future |
| Can manage currency configuration | Enable this feature to show the currency menu which allows for input of – Rate types – Rate configuration – Monthly rate For currency translation processes |
| Can access data explorer | Grants the user access to Data Explorer to view the data that has been imported to the Data Warehouse. – Data Explorer is an administrative tool with full, unrestricted access to all data. – Grant this permission to users who should see all data being imported into Solver. |
| Can delete data from data explorer | Allow users who have access to Data Explorer to delete data from this menu. |
| Can edit configuration | Allow users to create – Modules – Dimensions – Module Schema – Attributes – Period Configuration – API Access As this menu gives you access to enable the API, grant this permission to select users who are responsible for data governance. |
| Can edit dimension member and trees | All users with access to the Data Warehouse have read access to it. Grant this permission to give the user permission to add/edit/delete dimension codes and trees from within the Data Warehouse menu. |
| Can edit integrations, rules & jobs | Users will only be able to see integrations that have been configured but cannot see the details. Grant this permission so that users can see the mapping of an existing integration or create a new one. |
| Can run integrations, rules & jobs | Allows users to run data load processes. |
| Can manage connections | Enable this permission to grant users the ability to create additional connections to Solver to your on-premise ERP via the Hybrid Agent. |
| Can manage users, licenses and data access | All users with access to the Data Warehouse have read access to it. Grant this permission to give the user permission to add/edit/delete dimension codes and trees from within the Data Warehouse menu. |
| Can view audit log | Enables users to view audit log information via Settings > Audit Log |
Enabling a Permission
Permissions can be enabled at the User or Role level. To enable a permission
- Select the user or role from the list of names that you wish to grant a permission to.
- Expand the permission section by clicking on the title to display the list of permissions under that permission group.
- Toggle the switch on/off to enable/disable each set of permissions listed. If the toggle shows blue, the permission is active.
The change will take immediate effect. If the change does not appear in the interface for the user(s), they may need to refresh their browser or log in and out of the portal.
Disabling a Permission
Permissions can be disabled at the User or Role level. To disable a permission
- Click on the user or role you wish to revoke a permission.
- Expand the Permission section to display the list of the above-mentioned permissions. The current permission settings will load.
- Click to toggle bar to disable, toggle shows grey, the permission.
The change will take immediate effect. If the change does not appear in the interface for the user(s), they may need to refresh their browser.
Data Access
Data access allows administrators to control the data access that each user or role will have access to. The initial user invited to Solver, “your first admin”, has full data access. All users created after that will initially have no data access when added. Additionally, when you create a role, this role will not have data access. You can assign specific data rules to each added user in Solver or you can create a role with specific permissions and add user(s) to this role.
IMPORTANT: Data Explorer is considered an administrative tool and has full data access. Assign Data Explorer permissions to users who should have full data access.
Data Access Best Practices
Prior to configuring data access for your users, the following best practices should be considered when configuring data access.
- Data Access gives you the ability to use operators like “Begins with” and “contains” which can make data access easier to maintain. However, these operators are not performance-friendly and it is recommended to always use the “in” or “< >” operators.
- It is recommended to set filters on the code values or any attribute that is likely to not change. If, it is common that descriptions can change within your CoA and other data, it is not recommended to set security on this attribute.
- Users configuring data access, should have full data access. This is recommended because users with restricted access will only see the modules they have access to while configuring data access for others.
- If you require different dimension access across modules, you must define these permissions at the role level and assign the user(s) to that role. For example, if a user is supposed to see only specific employee payroll data but can then see all employee sales numbers, you cannot configure this security at the user level. Instead
- Create a role granting permissions to the Payroll module for employee 1, 2, 3…
- create a role granting permission to the Sales module for all employees
- Assign the user(s) to these two roles.
Configuring Data Access
To configure or grant a user or role access to see data within Solver. The following steps can be performed by your customer or tenant admin who has “can manage users, licensing and data access” permissions.
- Click Settings > Administration.
- The tenants will load on the left-hand side, select the tenant that you would like to assign permissions to. Permissions are a per tenant feature so customers who have multiple tenants will need to configure security for each tenant.
- After selecting the tenant, the main grid will populate with the tenant overview information.
- Click Users or Roles tab
- Select the user/role to be granted access and the previously configured permissions and security will load.
- Under Permissions, there is the option to give “has full data access”. This permission will give the user access to all data sources added to Solver, including those added in the future. If you want to assign permissions as data sources are added, scroll down to Data Access.
- Upon expanding on Data Access a list of Company(s) and the access information will appear
- None: this user/role has no permissions to this company
- Partial (inherited from role): the permissions for the selected user are being inherited from a role
- Partial: Unique data permissions have been assigned for this user.
- To give initial access, click the + icon. This will grant the user/role full permissions to the data source.
- Click the Pencil icon to edit roles and define the specific fact sets and dimensions the user should have access to.
- To restrict the modules the user should see, for example, to grant a user access only to the General Ledger,
- Drag Modules into the main grid
- By default, you are then assigned access to all modules.
- Click on the word <All> to display the lookup allowing you to choose specific modules the user should have access to, such as GL.
- If you have multiple modules you would like to grant access to,
- Hold the CTRL and click on the modules that you would like to grant
- Hold CTRL+Shift to select all values between your top and bottom selections.
- Click Use value to save and close the popup.
- IMPORTANT: if you assign a module, the user has full permissions to the module and its data. Add dimension security to restrict access to specific data within this module(s).
- To restrict data access on a dimension as well, for example, granting a user access only the revenue accounts,
- Find your account dimension on the left hand side and drag it into the main grid.
- By default, you are then assigned access to all account code.
- Click on the word <All> to display the lookup allowing you to choose specific account codes the user should have access to.
- Hold the CTRL and click on the modules that you’d like to grant
- Hold CTRL+Shift to select all values between your top and bottom selections
- Click Use value to save and close the popup.
- Click Save once done to save the changes.
Data access permissions are inherited immediately meaning the second after you hit save, the user will see data restrictions. However, the user interface may still show modules the user does not have access to until they have closed Report Designer or refreshed the browser when working with Ad Hoc.
Remove data access
If a user or role should no longer have access to the data for a company (all data or data specified by filters), you must delete the filters.
- Click a user or role.
- Scroll down to data access.
- In the main grid, the previously configured security details will appear.
- Click on the pencil icon for the security that you would like to remove.
- Click the X on the module and/or dimension to remove access.
- If you remove all fields, you have removed access to this company.
- Click Save to save the changes.
- The interface will update, now showing that the selected user no longer has access to the company.
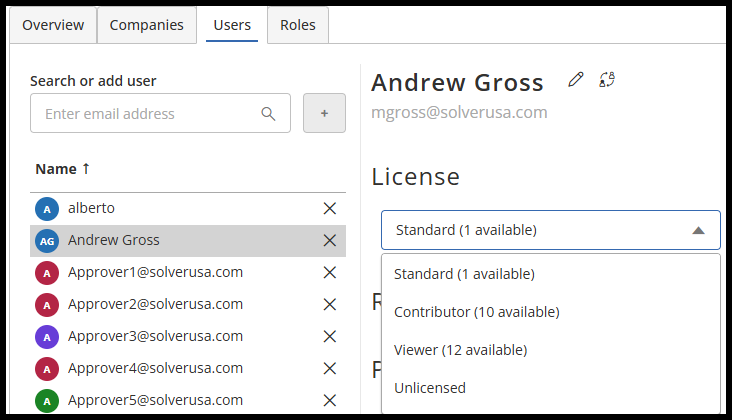
Licensing
Solver’s Licensing menu allows administrators to assign features to users. There are three types of users in Solver
- Standard Users: Full access to all features in Solver (Depending on the permissions assigned).
- Viewers: Access to some features. Mostly limited to viewing and consuming reports.
- Contributor Access to several features for reporting and completing assignments in Solver.
To use the Solver app, users must be assigned at least a Viewer License. Additional features, such as Report Designer, can also be added. Licensing is shared amongst all tenants you own that they have access to. For example, if a user is assigned a Standard license, this user will be a Standard user across all tenants you own.
Comparison Table
| Feature | Standard License | Viewer License | Contributor License |
|---|---|---|---|
| Reporting | ✅ | ✅ | ✅ |
| Report Designer | ✅ | ❌ | ❌ |
| Report Archive | ✅ | ✅ | ✅ |
| Planning | ✅ | ❌ | ✅ |
| Data Warehouse | ✅ | ❌ | ❌ |
| Publisher Recipient | ✅ | ✅ | ✅ |
| Assignments | ✅ | ❌ | ✅ |
| Workflow | ✅ | ❌ | ✅ |
| Drilldown Capabilities | ✅ | ❌ | ✅ |
Assigning Licenses
To assign a license,
- Click on Settings > Administration > Choose a tenant > Select a user.
- Choose a license type from the dropdown menu.
Use the chart above to grant access to specific features within Solver. Changes are applied the next time the user logs into Solver. If you are currently logged into Solver, refresh (F5) your browser if specific features are not appearing.
Removing a License
To remove a license, under the user menu, select a user and change their license status to Unlicensed.
These changes are applied immediately and are available the next time the user opens Solver.
Subscriptions
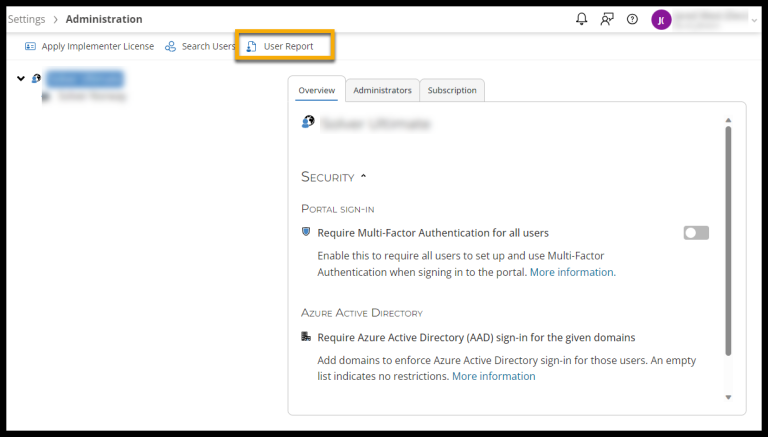
User Report
Customer Administrators with full administrative permissions in Solver have the ability to create a user report based on some of the data related to their users.
This includes information such as:
- Users assigned to the tenant(s).
- Roles
- Permissions
- Feature Access
- License
- Data Access
To create a User Report:
- Select the Settings menu from the main Solver toolbar.
- Choose Administration.
- Once you are on the administration page, select a tenant to view.
- Click the User Report button and allow the report to open in Report Designer.
Other Information
Solver Cloud does not support:
- On-Premise AD
- SAML 2.0